Build the map experience
This page shows how to build the map experience. In this workflow, the user browses Sites on a map, selects a Site with a Production VPS asset, and passes its anchor payload into the AR flow. The Unity implementation follows the Mapbox-based scene flow from the vps2-wayfinding-sample reference project: the app centers the map from playback, spoofed, or device location, loads Organizations and Sites through SitesClientManager, filters Sites for Production VPS assets, renders Site markers, and opens WayfindingAR with the selected payload.
This tutorial uses Mapbox for the sample map. You can use another map provider in your app.
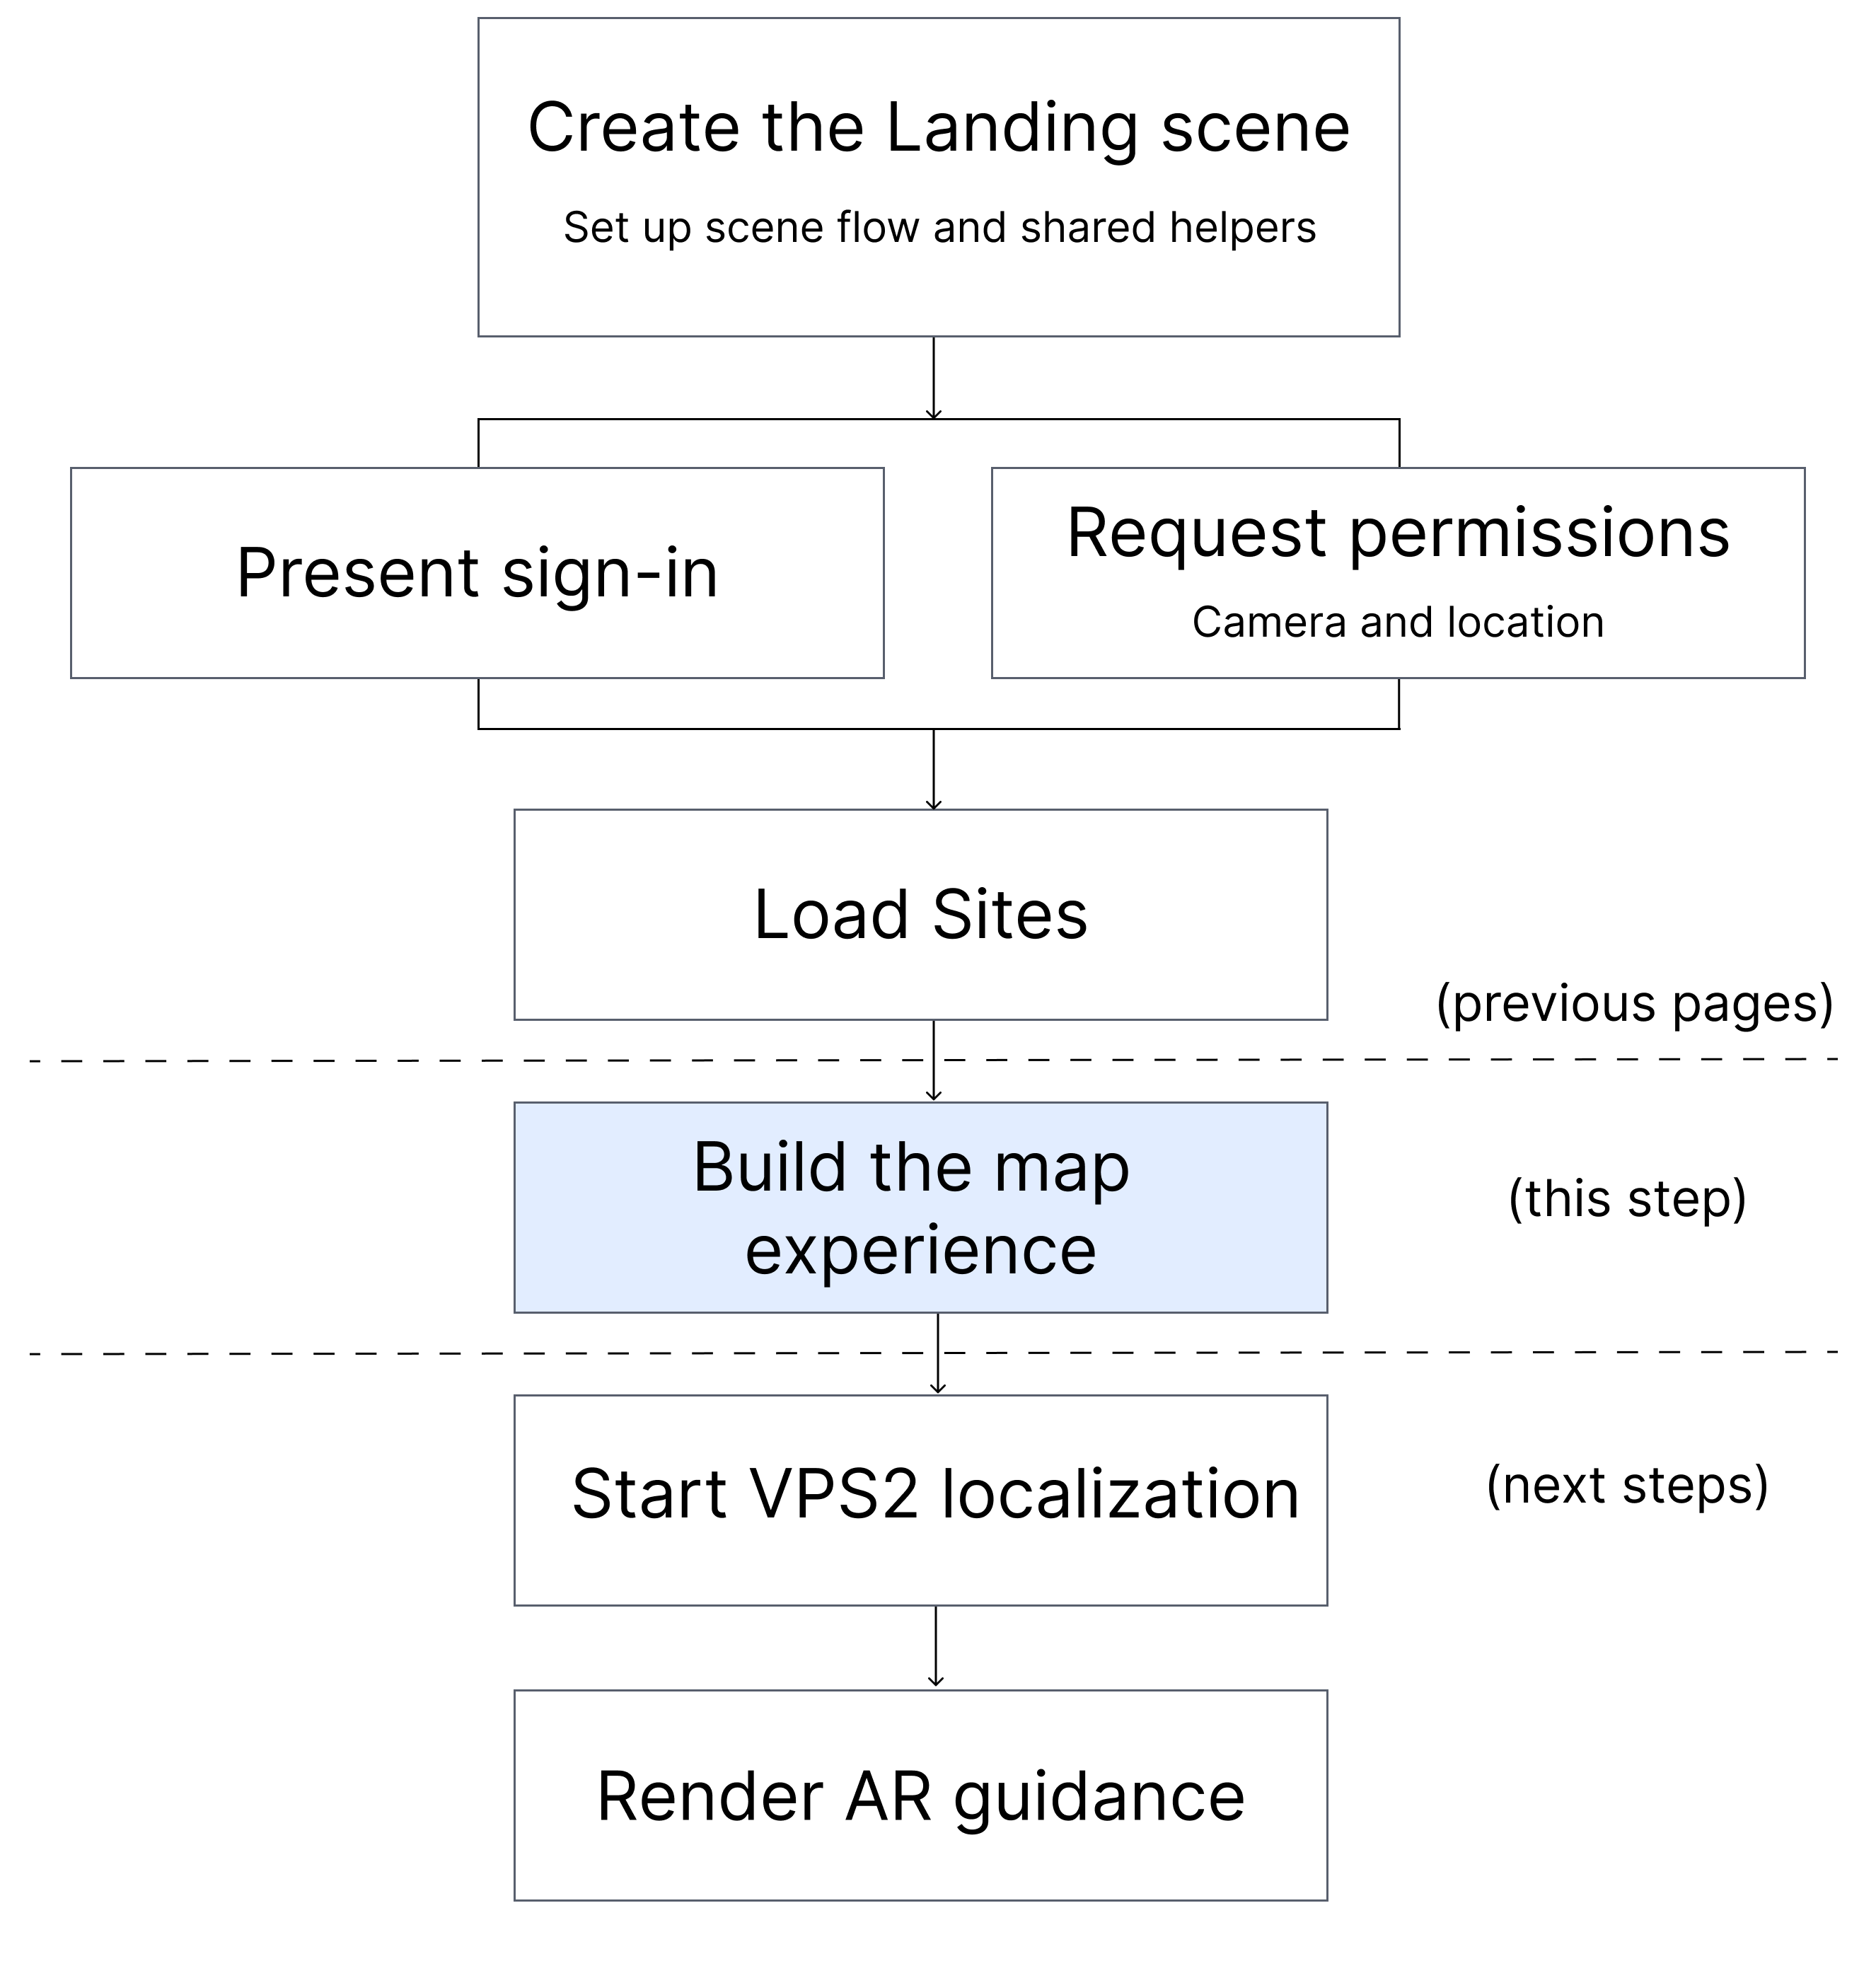
Figure: Build the map experience turns the placeholder WayfindingSitesMap scene into a Mapbox map that loads and filters VPS-ready Sites, renders Site markers, and carries the selected anchor payload into Start VPS2 localization.
This Build the map experience part of the guide shows you how to:
- Create the map screen so the placeholder scene from the previous page becomes a full-screen Sites map.
- Manage Sites data and state so the app can center the map and keep the loaded Organizations, Sites, and current selection in memory.
- Load and filter Sites for VPS2 so the map loads the signed-in user's Organizations and keeps only Sites with Production VPS assets.
- Render Site pins and select a Site so the user can tap a Site and continue into
WayfindingAR.
Files overview
Your app can organize those responsibilities in different files. The following table shows one working structure for the standalone Unity app in this tutorial and the matching files and assets in the vps2-wayfinding-sample sample.
| Responsibility | Standalone app | Sample reference |
|---|---|---|
| Create the map screen | Assets/Scenes/WayfindingSitesMap.unity, Assets/Mapbox/, Assets/Resources/Mapbox/MapboxConfiguration.txt, Assets/Textures/MapRenderTexture.renderTexture, Assets/Textures/pin-icon.png, and Assets/Materials/PinMat.mat create the full-screen map scene and its Mapbox configuration | Assets/Scenes/SitesMap.unity, Assets/Mapbox/, Assets/Resources/Mapbox/MapboxConfiguration.txt, Assets/Textures/MapRenderTexture.renderTexture, Assets/Textures/pin-icon.png, and Assets/Materials/PinMat.mat |
| Manage Sites data and state | Assets/Scripts/Map/WayfindingMapboxMapManager.cs and Assets/Scripts/Map/WayfindingEditorMapLocation.cs manage scene state, map centering, and NSDK Sites loading | Assets/Scripts/Map/MapboxMapManager.cs and Assets/Scripts/Map/NsdkEditorMapLocation.cs |
| Load and filter Sites for VPS2 | Assets/Scripts/Map/WayfindingMapboxMapManager.cs loads Organizations, queries Sites, and keeps only Production VPS assets with a non-empty anchor payload | Assets/Scripts/Map/MapboxMapManager.cs |
| Render Site pins and select a Site | Assets/Scripts/WayfindingSessionData.cs, Assets/Scripts/Map/WayfindingSiteMarker.cs, Assets/Scripts/Map/WayfindingMapMarkerClickHandler.cs, Assets/Prefabs/WayfindingSiteMarker.prefab, and Assets/Scenes/WayfindingSitesMap.unity carry the selected payload into WayfindingAR, render markers, handle taps, and show the selected-Site panel | Assets/Scripts/WayfindingSessionData.cs, Assets/Scripts/Map/SiteMarker.cs, Assets/Scripts/Map/MapMarkerClickHandler.cs, Assets/Prefabs/SiteMarker.prefab, and Assets/Scenes/SitesMap.unity |
Create the map screen
This step replaces the placeholder WayfindingSitesMap scene from the previous page with a full-screen Mapbox scene. It copies the sample's Mapbox assets and creates the scene objects that later steps wire to Sites loading, markers, and the selected-Site panel.
This step has two parts:
- Copy the map assets to add the Mapbox Unity SDK files and render assets the sample scene uses.
- Create the Sites map scene so later steps can wire Organizations, markers, and Site selection.
Copy the map assets
Copy the sample's map assets into your project as follows:
- Create a new folder
Assets/Mapboxin your app, then copy the contents ofAssets/Mapbox/fromvps2-wayfinding-sampleinto it. - Copy
Assets/Resources/Mapbox/MapboxConfiguration.txtfromvps2-wayfinding-sampleintoAssets/Resources/Mapbox/in your app. When prompted, enter the Mapbox token you set up in Prepare the sample project. - Copy
Assets/Textures/MapRenderTexture.renderTextureandAssets/Textures/pin-icon.pngfromvps2-wayfinding-sampleinto a new folderAssets/Textures/in your app. - Copy
Assets/Materials/PinMat.matfromvps2-wayfinding-sampleinto a new folderAssets/Materials/in your app. - Select
Assets/Textures/pin-icon.png, make sure Alpha Is Transparency is enabled in the Inspector, then select Apply. - Select
Assets/Materials/PinMat.mat, expand Surface Inputs, then dragAssets/Textures/pin-icon.pngonto the small texture square immediately to the left of Base Map so the marker quad displays the pin art instead of a solid square. The long field beside it controls the color tint, not the texture.
Create the Sites map scene
Open Assets/Scenes/WayfindingSitesMap.unity and complete the following sections.
Build the map background
Use these steps to add the Mapbox scene objects, route the map through a render texture, and show that texture in SitesCanvas so later steps can place UI controls and Site selection on top of the map:
- Drag
Assets/Mapbox/Prefabs/Map.prefabinto the Hierarchy to add the sample's map renderer to the scene. Unity will add one top-level object after you drag it into the scene called Map. Rename that root objectWayfindingMap. - In the Hierarchy for the open scene, create
GameObject > Create Emptyand name itMapboxManagerto hold the map manager in a later step. - With
MapboxManagerselected, createCamera, then rename the new cameraMapCamerato render the map into a texture. - Select
MapCamera, then in the Inspector do the following to route the map render into the UI:- In the
Transformcomponent, set Position toX = 0,Y = 10, andZ = 0. - Set Rotation to
X = 90,Y = 0, andZ = 0so the camera looks down at the map and marker quads. - In the
Cameracomponent, set Projection toOrthographicand Size to150. - Under Clipping Planes, keep Near at
0.3and set Far to100. - Uncheck the box next to
Audio Listenerat the bottom of the Inspector so the scene still uses only theMainCameralistener. - Drag
Assets/Textures/MapRenderTexture.renderTextureto Output Texture soMapCamerarenders the map into the UI texture.
- In the
- In the Hierarchy, create
GameObject > Create Emptyand name itSitesClientManagerto hold the Sites loader in a later step. - With
SitesClientManagerselected, select Add Component in the Inspector and enterSitesClientManagerto attach theSitesClientManagerscript to that scene object. - In the existing
SitesCanvas, create+ > UI > Raw Imageand name itMapImageto display the rendered map. - Select
MapImage, then in the Inspector update itsRect Transformas follows to make the map fill the screen:- Open the anchor preset control by selecting the small square to the left of
Pos XandPos Y. - In the anchor preset popup, choose the full stretch preset on the bottom right so
MapImagefills the canvas. - Set
Left,Right,Top, andBottomto0. - Drag
Assets/Textures/MapRenderTexture.renderTextureto Texture to show the map output.
- Open the anchor preset control by selecting the small square to the left of
Validate this part:
- Select
MapCamera, then temporarily change its background color in the Inspector to Hexadecimal valueF30909. - In the
Gameview, make sure the whole screen changes to that color. - Set the
MapCamerabackground color back toFFFFFFwhen you finish this check.
Add the top controls
Use these steps to add the dropdowns that later steps fill with Organizations and map styles:
- In the Hierarchy, create
UI > Event Systemso these dropdowns can receive taps later on device. - In
SitesCanvas, createUI > Dropdown - TextMeshProand name itOrganizationDropdown. - Select
OrganizationDropdown, then update itsRect Transformas follows:- Select the small square to the left of
Pos XandPos Yin the Inspector to open the anchor preset control, then choose the top-right preset that does not stretch. - Set
Pos Xto-350. - Set
Pos Yto-250. - Set
Widthto650. - Set
Heightto120.
- Select the small square to the left of
- Duplicate
OrganizationDropdown, rename the copyMapTypeDropdown, then update itsRect Transformas follows:- Select the small square to the left of
Pos XandPos Yin the Inspector, then choose the bottom-right preset that does not stretch. - Set
Pos Xto-125. - Set
Pos Yto578. - Set
Widthto140. - Set
Heightto128.
- Select the small square to the left of
- Replace the default Options in the Inspector for
MapTypeDropdownwithStreet,Satellite, andHybridto give the user options for the type of map they can select. - Expand
OrganizationDropdown, select its childLabel, then set theTextMeshPro - Text (UI)component so the selected Organization name stays readable in the wider top control:- Set
Font Sizeto48. - Make sure Auto Size stays off.
- Set Text Wrapping Mode to
No Wrap.
- Set
- Expand
OrganizationDropdown/Template/Viewport/Content, then update the dropdown row sizes to match the sample:- Select
Content, then set itsRect TransformHeightto64. - Select
Item, then set itsRect TransformHeightto72. - Select
Item'sItem Label, then set theTextMeshPro - Text (UI)componentFont Sizeto48.
- Select
- Expand
MapTypeDropdown, select its childLabel, then set theTextMeshPro - Text (UI)component so the selected map type stays readable in the narrower bottom-right control:- Set
Font Sizeto36. - Select the checkbox next to Auto Size.
- Set the minimum size to
30. - Set the maximum size to
36.
- Set
- Expand
MapTypeDropdown, select its childTemplate, then update itsRect Transform:- Set
Leftto-150. - Set
Rightto0. - Set
Pos Yto2. - Set
Heightto200.
- Set
- Expand
MapTypeDropdown/Template/Viewport/Content, then update the dropdown row sizes and text so the map-style list stays readable: - Select
Content, then set itsRect TransformHeightto64. - Select
Item, then set itsRect TransformHeightto72. - Select
Item'sItem Label, then set theTextMeshPro - Text (UI)componentFont Sizeto48.
Validation for this canvas is included after the next section, which adds the popup UI to the same canvas.
Create the selected-Site panel
Use these steps to build a full-screen selected-Site popup with a dimmed background, a centered card, the selected Site text, and two buttons:
- In
SitesCanvas, deleteSelectedSiteTitlebecause the popup will create its own title. - In
SitesCanvas, create UI > Panel and name itSelectedSitePopupto hold the full popup UI. - In the Inspector for
SelectedSitePopup, set theImagecomponentColoralpha to0to make the popup root invisible, then set theRect TransformLeftvalue to-50to give the popup content a little more room away from theMapTypeDropdown. - In
SelectedSitePopup, create UI > Panel and name itBlockerto dim the map behind the popup. - Use the default full-screen panel size for
Blocker, then in the Inspector lower theImagecomponentColoralpha to about20%. - In
SelectedSitePopup, create UI > Panel and name itPopupBGto hold the selected-Site content. - Select
PopupBG, then update itsRect Transformas follows:- Select the small square to the left of
Pos XandPos Yin the Inspector to open the anchor preset control, then choose the center preset that does not stretch. - Set
Pos Xto0. - Set
Pos Yto-140. - Set
Widthto720. - Set
Heightto420.
- Select the small square to the left of
- In
PopupBG, create UI > Text - TextMeshPro and name itSiteNameto show the selected Site name. - Select
SiteName, then update itsRect Transformas follows:- Select the small square to the left of
Pos XandPos Yin the Inspector to open the anchor preset control, then choose the top-center preset that does not stretch. - Set
Pos Xto0. - Set
Pos Yto-70. - Set
Widthto625. - Set
Heightto70.
- Select the small square to the left of
- Set the
SiteNameText Input toSite Name. - Set the
SiteNamefont size to48, enable auto size, set the minimum size to24, set the maximum size to48, select Bold, and set Vertex Color to hexadecimal1A1F26so Site names remain readable over light map tiles. - In
PopupBG, create UI > Text - TextMeshPro and name itSelectedSiteDetailsto show the selected Site details. - Select
SelectedSiteDetails, then update itsRect Transformas follows: - Select the small square to the left of
Pos XandPos Yin the Inspector to open the anchor preset control, then choose the center preset that does not stretch. - Set
Pos Xto0. - Set
Pos Yto-10. - Set
Widthto620. - Set
Heightto48. - Set the
SelectedSiteDetailsText Input toVPS Asset Type. - Set the
SelectedSiteDetailsfont size to28and Vertex Color to hexadecimal1A1F26. - In
PopupBG, create UI > Button - TextMeshPro and name itNavigateButtonto open the AR route for the selected Site. - Select
NavigateButton, then update itsRect Transformas follows: - Select the small square to the left of
Pos XandPos Yin the Inspector to open the anchor preset control, then choose the center preset that does not stretch. - Set
Pos Xto0. - Set
Pos Yto-90. - Set
Widthto240. - Set
Heightto60. - Select the drop-down arrow next to
NavigateButtonin the Hierarchy, select its child Text (TMP), then change Text Input in the Inspector toNavigate. - In
PopupBG, create UI > Button - TextMeshPro and name itClosePopupto dismiss the popup. - Select
ClosePopup, then update itsRect Transformas follows: - Select the small square to the left of
Pos XandPos Yin the Inspector to open the anchor preset control, then choose the top-right preset that does not stretch. - Set
Pos Xto-32. - Set
Pos Yto-32. - Set
Widthto56. - Set
Heightto56. - Select the drop-down arrow next to
ClosePopupin the Hierarchy, select its child Text (TMP), then change Text Input in the Inspector toX.
Validate this part:
Use the Game view to check that one dimmed overlay and one centered card are visible, and that the card shows Site Name, VPS Asset Type, Navigate, and X without overlapping text.
After validation, select SelectedSitePopup, then uncheck the checkbox next to its name at the top of the Inspector to start with the popup hidden until the user selects a Site.
Create the loading card
Use these steps to build a full-screen loading overlay with centered text:
- In
SitesCanvas, create UI > Panel and name itLoadingIndicatorwhich covers the map while data loads. - In the Inspector, find the
Imagecomponent forLoadingIndicator, select theColorswatch to open the color picker, then lowerAto50to dim the map while data loads. - In
LoadingIndicator, create UI > Text - TextMeshPro and name itLoadingText. - Select
LoadingText, then update itsRect Transformto match the sample centered text area:- Select the small square to the left of
Pos XandPos Yin the Inspector to open the anchor preset control, then choose the center preset that does not stretch. - Set
Pos Xto0. - Set
Pos Yto0. - Set
Widthto550. - Set
Heightto155.
- Select the small square to the left of
- Set the
LoadingTextText Input toLoading Organizations.... - Set the
LoadingTextfont size to60, then enable auto size with a minimum size of18and a maximum size of60. - Use the Game view to check that one dimmed overlay covers the map and that
Loading Organizations...appears centered and readable.
Validate this step:
- In the Game view, one dimmed overlay covers the map and
Loading Organizations...appears centered and readable. After validation, selectLoadingIndicator, then uncheck the checkbox next to its name at the top of the Inspector so the app starts with the loading overlay hidden and only shows it while Organizations or Sites are loading.
Manage Sites data and state
This step adds the scene manager that owns the map scene references, loading state, Organizations, loaded Sites, and the selected Site. It also adds the Editor-only helper that centers the map from playback or spoofed location when you validate the scene in Unity.
This step has three parts:
- Create the Sites map manager to own the map scene state and placeholder loading flow.
- Create the editor map-location helper to center the map from playback or spoofed location in the Editor.
- Wire the scene manager to the map, dropdowns, panels, and Sites client in
WayfindingSitesMap.unity.
Create the Sites map manager
Create an Assets/Scripts/Map/ folder, then create Assets/Scripts/Map/WayfindingSiteMarker.cs so Unity can compile the Sites map manager that references each rendered Site marker:
Expand to view WayfindingSiteMarker.cs
using System;
using Mapbox.Utils;
using NianticSpatial.NSDK.AR.Sites;
using UnityEngine;

public class WayfindingSiteMarker : MonoBehaviour
{
    private WayfindingMapboxMapManager _mapManager;
    private Tuple<SiteInfo, AssetInfo> _siteInfo;

    // Keep one Site and VPS asset attached to each rendered marker.
    // In your own app, replace this with whatever model you use to store
    // the selected Site and its Production VPS asset together.
    public Vector2d LatLong => new Vector2d(_siteInfo.Item1.Latitude, _siteInfo.Item1.Longitude);

    public void Init(WayfindingMapboxMapManager mapManager, Tuple<SiteInfo, AssetInfo> siteInfo)
    {
        // Save the scene manager and the Site data this marker should report
        // back when the user taps it.
        _mapManager = mapManager;
        _siteInfo = siteInfo;
    }

    public void OnClick()
    {
        // Forward the tap back to the scene manager so later steps can update
        // the selected-Site panel and start AR navigation.
        _mapManager.SelectSite(_siteInfo);
    }
}
Then create Assets/Scripts/Map/WayfindingMapboxMapManager.cs to manage the Sites scene, map state, and selected Site:
Expand to view WayfindingMapboxMapManager.cs
using System;
using System.Collections;
using System.Collections.Generic;
using System.Linq;
using System.Threading;
using System.Threading.Tasks;
using Mapbox.Unity.Map;
using Mapbox.Utils;
using NianticSpatial.NSDK.AR.Sites;
using TMPro;
using UnityEngine;
using UnityEngine.SceneManagement;
using UnityEngine.UI;
#if UNITY_EDITOR
using NsdkInput = NianticSpatial.NSDK.AR.Input;
#endif

/// <summary>
/// Owns the tutorial's Sites map: map presentation, Organization/Site loading,
/// marker creation, selection UI, and the handoff into the AR scene.
///
/// In your own app, keep the SitesClientManager request and VPS asset-selection logic,
/// but replace the Mapbox, dropdown, popup, and scene-navigation fields with your app's
/// map provider, presentation layer, and routing/state systems.
/// </summary>
public class WayfindingMapboxMapManager : MonoBehaviour
{
    // CUSTOMIZE: Adjust these values for the padding and zoom range supported by your map UI.
    private const float MaximumFitZoom = 15f;
    private const float MinimumFitZoom = 1f;
    private const float FitViewportWidth = 0.70f;
    private const float FitViewportHeight = 0.60f;

    // These scene references come from the Sites map scene you build in this
    // tutorial. In your own app, replace them with the map, camera, and UI
    // objects that already exist in your scene.
    [SerializeField] private AbstractMap abstractMap;
    [SerializeField] private Camera mapCamera;
    [SerializeField] private RawImage mapImage;
    [SerializeField] private TMP_Dropdown organizationDropdown;
    [SerializeField] private TMP_Dropdown mapTypeDropdown;
    [SerializeField] private GameObject selectedSitePanel;
    [SerializeField] private TMP_Text selectedSiteTitle;
    [SerializeField] private TMP_Text selectedSiteDetails;
    [SerializeField] private GameObject loadingIndicator;
    [SerializeField] private TMP_Text loadingText;
    [SerializeField] private SitesClientManager sitesClientManager;
    [SerializeField] private GameObject siteMarkerPrefab;

    private float _aspectRatio = 1f;
    // Keep the loaded Organizations, filtered Sites, and live marker objects
    // in memory so later steps can refresh the map and selected-Site panel.
    private readonly List<OrganizationInfo> _organizations = new();
    private readonly List<Tuple<SiteInfo, AssetInfo>> _sites = new();
    private readonly List<WayfindingSiteMarker> _createdMarkers = new();

    // Store the current Site selection so later steps can pass its payload
    // into the AR scene.
    private Tuple<SiteInfo, AssetInfo> _selectedSite;
    private CancellationTokenSource _cancellationTokenSource;
    // AbstractMap raises OnInitialized after its scaling, placement, and tile-provider
    // strategies are ready. Queue an early device/Site center until that point.
    private bool _mapInitialized;
    private bool _hasPendingMapCenter;
    private Vector2d _pendingMapCenter;
    private bool _hasPendingFitAllSites;
    // Increment this value for each Sites request so an older response cannot overwrite
    // a newer Organization selection. A production data layer can use per-request cancellation instead.
    private int _sitesLoadVersion;

    public bool PopupOpen =>
        (selectedSitePanel != null && selectedSitePanel.activeSelf)
        || (loadingIndicator != null && loadingIndicator.activeSelf);

    private void Awake()
    {
        if (abstractMap != null)
        {
            abstractMap.OnInitialized += OnMapInitialized;
        }
    }

    private IEnumerator Start()
    {
        // Start from a clean UI state before the first Sites request runs.
        _cancellationTokenSource = new CancellationTokenSource();
        SubscribeToEvents(true);
        if (selectedSitePanel != null)
        {
            selectedSitePanel.SetActive(false);
        }
        if (loadingIndicator != null)
        {
            loadingIndicator.SetActive(false);
        }

        // Keep Site information readable over light map tiles.
        // CUSTOMIZE: Replace this with your map UI's text style or theme.
        var mapTextColor = new Color(0.10f, 0.12f, 0.15f, 1f);
        if (selectedSiteTitle != null)
        {
            selectedSiteTitle.color = mapTextColor;
            selectedSiteTitle.fontStyle = FontStyles.Bold;
        }
        if (selectedSiteDetails != null)
        {
            selectedSiteDetails.color = mapTextColor;
        }

        // Start the first load cycle, then center the map.
        LoadOrganizations();

#if UNITY_EDITOR
        yield return TryCenterMapInEditorCoroutine();
#else
        yield return TryCenterMapAtCurrentLocationCoroutine();
#endif
    }

    private void OnDestroy()
    {
        if (abstractMap != null)
        {
            abstractMap.OnInitialized -= OnMapInitialized;
        }
        SubscribeToEvents(false);
        _cancellationTokenSource?.Cancel();
        _cancellationTokenSource?.Dispose();
        _cancellationTokenSource = null;
    }

    private void OnMapInitialized()
    {
        _mapInitialized = true;
        if (_hasPendingFitAllSites)
        {
            _hasPendingFitAllSites = false;
            FitMapToSites();
            return;
        }

        if (!_hasPendingMapCenter)
        {
            return;
        }

        var pendingCenter = _pendingMapCenter;
        _hasPendingMapCenter = false;
        CenterMapAtLatLong(pendingCenter);
    }

    private void SubscribeToEvents(bool subscribe)
    {
        // Keep the scene dropdowns connected while this scene is active.
        if (subscribe)
        {
            organizationDropdown?.onValueChanged.AddListener(OnOrganizationDropdownSelected);
            mapTypeDropdown?.onValueChanged.AddListener(OnMapTypeDropdownSelected);
        }
        else
        {
            organizationDropdown?.onValueChanged.RemoveListener(OnOrganizationDropdownSelected);
            mapTypeDropdown?.onValueChanged.RemoveListener(OnMapTypeDropdownSelected);
        }
    }

    private void LoadOrganizations()
    {
        if (loadingIndicator != null)
        {
            loadingIndicator.SetActive(true);
        }
        if (loadingText != null)
        {
            loadingText.text = "Loading Organizations...";
        }

        // Later steps replace this placeholder with your real Organization
        // query. If your app already caches Organizations somewhere else,
        // call that code here instead of duplicating it.
    }

    private void SelectOrganization(string organizationName)
    {
        // Later steps replace this placeholder with your own "current
        // Organization" update logic before loading Sites for that choice.
    }

    private void ClearSites()
    {
        while (_createdMarkers.Count > 0)
        {
            Destroy(_createdMarkers[0].gameObject);
            _createdMarkers.RemoveAt(0);
        }

        _sites.Clear();
    }

    private async void PopulateSites(OrganizationInfo? organizationInfo)
    {
        ClearSites();

        // Later steps replace this placeholder with your real Sites query and
        // Production VPS asset filtering. If your app already wraps the Sites
        // SDK in another service, call that service here.
        await Task.CompletedTask;
    }

    private void TryRenderSites()
    {
        // Later steps replace this placeholder with your marker creation code.
        // If your app uses a different pin prefab or annotation system, create
        // those marker objects here instead.
    }

    private void FitMapToSites()
    {
        // Later steps replace this placeholder with the viewport calculation that
        // frames every loaded Site instead of centering on only the first result.
    }

    public void SelectSite(Tuple<SiteInfo, AssetInfo> siteInfo)
    {
        // Update the selected-Site panel when the user taps a Site marker.
        // In your own app, this is where you can also store the selected
        // payload in whatever navigation or state object your AR route reads.
        _selectedSite = siteInfo;

        if (selectedSiteTitle != null)
        {
            selectedSiteTitle.text = siteInfo.Item1.Name;
        }
        if (selectedSiteDetails != null)
        {
            selectedSiteDetails.text = $"VPS Asset Type: {siteInfo.Item2.AssetType}";
        }
        if (selectedSitePanel != null)
        {
            selectedSitePanel.SetActive(true);
        }
    }

    public void CloseSelectedSitePanel()
    {
        if (selectedSitePanel != null)
        {
            selectedSitePanel.SetActive(false);
        }
    }

    private void LateUpdate()
    {
        // Keep the map render texture and Site marker positions aligned with the screen.
        if (mapCamera == null || mapImage == null || abstractMap == null)
        {
            return;
        }

        var newAspectRatio = (float)Screen.width / Screen.height;
        if (!Mathf.Approximately(newAspectRatio, _aspectRatio))
        {
            _aspectRatio = newAspectRatio;
            var aspectRect = new Rect(0f, 0f, _aspectRatio, 1f);
            mapCamera.rect = aspectRect;
            mapImage.uvRect = aspectRect;
        }

        foreach (var marker in _createdMarkers)
        {
            marker.transform.position = abstractMap.GeoToWorldPosition(marker.LatLong, false);
        }
    }

    public void OnOrganizationDropdownSelected(int selection)
    {
        if (selection < 0 || selection >= _organizations.Count)
        {
            return;
        }

        SelectOrganization(_organizations[selection].Name);
    }

    public void OnMapTypeDropdownSelected(int mapType)
    {
        if (abstractMap == null)
        {
            return;
        }

        switch (mapType)
        {
            case 1:
                abstractMap.ImageLayer.SetLayerSource(ImagerySourceType.MapboxSatellite);
                break;
            case 2:
                abstractMap.ImageLayer.SetLayerSource(ImagerySourceType.MapboxSatelliteStreet);
                break;
            default:
                abstractMap.ImageLayer.SetLayerSource(ImagerySourceType.MapboxStreets);
                break;
        }

        abstractMap.UpdateMap();
    }

    public void CenterTheMapAtCurrentLocationPublic()
    {
        CenterTheMapAtCurrentLocation();
    }

    private bool CenterTheMapAtCurrentLocation()
    {
        // Do not read lastData until Unity reports a running location service.
        var status = Input.location.status;
        return status == LocationServiceStatus.Running
            && TryCenterMapFromLocationService(status, Input.location.lastData);
    }

#if UNITY_EDITOR
    private IEnumerator TryCenterMapInEditorCoroutine()
    {
        if (WayfindingEditorMapLocation.TryGetMapCenter(out var latLong))
        {
            CenterMapAtLatLong(latLong);
            yield break;
        }

        yield return TryCenterMapAtNsdkLocationCoroutine();
    }

    private IEnumerator TryCenterMapAtNsdkLocationCoroutine()
    {
        const float timeoutSeconds = 20f;
        var elapsed = 0f;

        while (elapsed < timeoutSeconds)
        {
            if (NsdkInput.location.status is LocationServiceStatus.Stopped or LocationServiceStatus.Failed)
            {
                NsdkInput.location.Start();
            }

            var status = NsdkInput.location.status;
            if (status == LocationServiceStatus.Running
                && TryCenterMapFromLocationService(status, NsdkInput.location.lastData))
            {
                yield break;
            }

            elapsed += 0.1f;
            yield return new WaitForSeconds(0.1f);
        }
    }
#endif

    private IEnumerator TryCenterMapAtCurrentLocationCoroutine()
    {
        const float timeoutSeconds = 20f;
        var elapsed = 0f;

        while (elapsed < timeoutSeconds)
        {
            if (Input.location.status is LocationServiceStatus.Stopped or LocationServiceStatus.Failed)
            {
                Input.location.Start();
            }

            var status = Input.location.status;
            if (status == LocationServiceStatus.Running
                && TryCenterMapFromLocationService(status, Input.location.lastData))
            {
                yield break;
            }

            elapsed += 0.1f;
            yield return new WaitForSeconds(0.1f);
        }
    }

    private bool TryCenterMapFromLocationService(LocationServiceStatus status, LocationInfo lastData)
    {
        if (status != LocationServiceStatus.Running)
        {
            return false;
        }

        CenterMapAtLatLong(new Vector2d(lastData.latitude, lastData.longitude));
        return true;
    }

    private void CenterMapAtLatLong(Vector2d latLong)
    {
        if (abstractMap == null)
        {
            return;
        }

        // AbstractMap.UpdateMap expects initialization to have created its scaling and
        // placement strategies. Save the newest requested center instead of calling it early.
        if (!_mapInitialized)
        {
            _pendingMapCenter = latLong;
            _hasPendingMapCenter = true;
            return;
        }

        abstractMap.SetCenterLatitudeLongitude(latLong);
        abstractMap.UpdateMap();
    }
}
Create the editor map-location helper
Create Assets/Scripts/Map/WayfindingEditorMapLocation.cs to read map-centering coordinates from NSDK settings in the Unity Editor:
Expand to view WayfindingEditorMapLocation.cs
#if UNITY_EDITOR

using System;
using System.IO;
using Mapbox.Utils;
using NianticSpatial.NSDK.AR;
using NianticSpatial.NSDK.AR.Loader;
using UnityEngine;

public static class WayfindingEditorMapLocation
{
    // Center the editor map on the same location this walkthrough uses for testing.
    // In your own app, replace this helper if you already store a preferred editor start location.
    public static bool TryGetMapCenter(out Vector2d latLong)
    {
        latLong = default;
        var settings = NsdkSettings.Instance;
        if (settings == null)
        {
            return false;
        }

        var playback = settings.EditorPlaybackSettings;
        if (playback.UsePlayback
            && !string.IsNullOrWhiteSpace(playback.PlaybackDatasetPath)
            && TryGetPlaybackStartLocation(playback.PlaybackDatasetPath, playback.StartFrame, out latLong))
        {
            // Use the playback dataset first so the editor map opens where recorded testing starts.
            return true;
        }

        if (settings.LocationAndCompassDataSource == LocationDataSource.Spoof)
        {
            // Fall back to the spoofed location when playback is not enabled.
            var spoof = settings.SpoofLocationInfo;
            latLong = new Vector2d(spoof.Latitude, spoof.Longitude);
            return true;
        }

        return false;
    }

    private static bool TryGetPlaybackStartLocation(string datasetPath, int startFrame, out Vector2d latLong)
    {
        latLong = default;

        // Read the dataset metadata so the editor map can reuse the first valid recorded GPS frame.
        var capturePath = Path.Combine(datasetPath, "capture.json");
        if (!File.Exists(capturePath))
        {
            return false;
        }

        CaptureJson capture;
        try
        {
            capture = JsonUtility.FromJson<CaptureJson>(File.ReadAllText(capturePath));
        }
        catch (Exception exception)
        {
            // Keep Editor validation usable when a playback dataset is malformed,
            // but surface the failure instead of silently falling back.
            Debug.LogWarning($"WayfindingEditorMapLocation: Could not read '{capturePath}': {exception.Message}");
            return false;
        }

        if (capture.frames == null || capture.frames.Length == 0)
        {
            return false;
        }

        var firstFrameIndex = Mathf.Clamp(startFrame, 0, capture.frames.Length - 1);
        for (var i = firstFrameIndex; i < capture.frames.Length; i++)
        {
            var location = capture.frames[i].location;
            if (location == null || location.positionTimestamp == 0)
            {
                continue;
            }

            // Use the first valid location at or after the configured playback start frame.
            latLong = new Vector2d(location.latitude, location.longitude);
            return true;
        }

        return false;
    }

    [Serializable]
    private class CaptureJson
    {
        // Mirror just the top-level capture.json field this helper needs.
        // In your own app, extend this only if your editor centering logic needs more dataset metadata.
        public Frame[] frames;
    }

    [Serializable]
    private class Frame
    {
        // Keep only the recorded location payload for each playback frame.
        public Location location;
    }

    [Serializable]
    private class Location
    {
        // Read the latitude, longitude, and timestamp values that identify
        // the first valid playback position for centering the editor map.
        public double latitude;
        public double longitude;
        public double positionTimestamp;
    }
}

#endif
Wire the scene manager
Open Assets/Scenes/WayfindingSitesMap.unity and wire WayfindingMapboxMapManager.cs as follows:
- Select
MapboxManager, then use Add Component to attachWayfindingMapboxMapManager.cs. - Drag
WayfindingMapfrom Hierarchy into the Abstract Map field so the manager can center and update the map and position Site markers. - Drag
MapCamerainto Map Camera so the manager can keep the map rendering aligned with the screen. - Drag
SitesCanvas/MapImageinto Map Image so the manager can align the displayed map texture withMapCamera. - Drag
SitesCanvas/OrganizationDropdowninto Organization Dropdown so the manager can display Organizations and load the selected Organization's Sites. - Drag
SitesCanvas/MapTypeDropdowninto Map Type Dropdown so the manager can change the Mapbox imagery style. - Drag
SitesCanvas/SelectedSitePopupinto Selected Site Panel so the manager can show or hide the selected-Site popup. - Drag
SitesCanvas/SelectedSitePopup/PopupBG/SiteNameinto Selected Site Title so the popup can display the selected Site name. - Drag
SitesCanvas/SelectedSitePopup/PopupBG/SelectedSiteDetailsinto Selected Site Details so the popup can display the selected Site's VPS asset details. - Drag
SitesCanvas/LoadingIndicatorinto Loading Indicator so the manager can cover the map while data loads. - Drag
LoadingTextinto Loading Text so the manager can describe the current loading request. - Drag
SitesClientManagerinto Sites Client Manager so the map manager can request Organizations, Sites, and VPS assets from NSDK. - Leave Site Marker Prefab empty for now. A later step adds the marker prefab.
Validate this step:
- Select
MapboxManagerin the Hierarchy. - In the
WayfindingMapboxMapManagercomponent, make sureAbstract Map,Map Camera,Map Image,Organization Dropdown,Map Type Dropdown,Selected Site Panel,Selected Site Title,Selected Site Details,Loading Indicator,Loading Text, andSites Client Managerare all filled and none showNone. - Select each assigned field once and make sure Unity highlights the expected object in the Hierarchy.
- Stop here and continue to the next sections. Runtime validation happens after the loading code and marker prefab are added later on this page.
Load and filter Sites for VPS2
This step replaces the temporary loading stubs in WayfindingMapboxMapManager.cs. It loads Organizations into the dropdown, queries Sites for the selected Organization, and keeps only Sites that have map coordinates and a Production VPS asset with a non-empty anchor payload.
This step has two parts:
- Load Organizations so the dropdown fills from the signed-in account.
- Filter Sites for Production VPS assets so only VPS-ready Sites remain.
Load Organizations
Update Assets/Scripts/Map/WayfindingMapboxMapManager.cs and replace the existing LoadOrganizations and SelectOrganization stubs.
Expand to view LoadOrganizations() and SelectOrganization() in WayfindingMapboxMapManager.cs
private async void LoadOrganizations()
{
    if (sitesClientManager == null)
    {
        Debug.LogError("WayfindingMapboxMapManager: Assign SitesClientManager.");
        return;
    }

    if (loadingIndicator != null)
    {
        loadingIndicator.SetActive(true);
    }
    if (loadingText != null)
    {
        loadingText.text = "Loading Organizations...";
    }

    Debug.Log("WayfindingMapboxMapManager: Loading organizations.");
    var token = _cancellationTokenSource.Token;
    var startedSitesLoad = false;

    try
    {
        // Request the signed-in user's Organizations from NSDK.
        // In your own app, this is where you would apply any Organization filtering before filling the dropdown.
        var result = await sitesClientManager.GetSelfOrganizationInfoAsync(token);
        if (token.IsCancellationRequested)
        {
            return;
        }

        if (result.Status != SitesRequestStatus.Success)
        {
            Debug.LogError("WayfindingMapboxMapManager: Failed to load Organizations.");
            return;
        }

        _organizations.Clear();
        _organizations.AddRange(result.Organizations);
        Debug.Log($"WayfindingMapboxMapManager: Loaded {_organizations.Count} organizations.");

        // Show the returned Organization names in the dropdown.
        var names = _organizations.Select(item => item.Name).ToList();
        organizationDropdown?.ClearOptions();
        organizationDropdown?.AddOptions(names);

        // Select the first Organization so the next request can load Sites.
        if (_organizations.Count > 0)
        {
            // PopulateSites now owns the loading overlay until its request completes.
            startedSitesLoad = true;
            SelectOrganization(_organizations[0].Name);
        }
        else
        {
            Debug.LogWarning("WayfindingMapboxMapManager: No organizations were returned.");
        }
    }
    catch (Exception exception)
    {
        if (!token.IsCancellationRequested)
        {
            Debug.LogException(exception);
        }
    }
    finally
    {
        // Do not leave a full-screen loading overlay active after an Organization
        // failure or empty response. A successful handoff lets PopulateSites hide it.
        if (!startedSitesLoad && loadingIndicator != null)
        {
            loadingIndicator.SetActive(false);
        }
    }
}

private void SelectOrganization(string organizationName)
{
    // Match the selected dropdown value back to the loaded Organization.
    // In your own app, this is the handoff point where changing Organizations triggers a new Site query.
    var organizationInfo = _organizations.Find(item => item.Name == organizationName);
    Debug.Log($"WayfindingMapboxMapManager: Selected organization '{organizationName}'.");
    PopulateSites(organizationInfo);
}
Filter Sites for Production VPS assets
Update Assets/Scripts/Map/WayfindingMapboxMapManager.cs and replace the temporary PopulateSites stub to load Sites and filter them for Production VPS assets:
Expand to view PopulateSites() in WayfindingMapboxMapManager.cs
private async void PopulateSites(OrganizationInfo? organizationInfo)
{
    // Clear the previous markers before loading a new Organization's Sites.
    ClearSites();
    var loadVersion = ++_sitesLoadVersion;

    if (organizationInfo == null)
    {
        Debug.LogError("WayfindingMapboxMapManager: Select an Organization before loading Sites.");
        if (loadingIndicator != null)
        {
            loadingIndicator.SetActive(false);
        }
        return;
    }

    if (loadingIndicator != null)
    {
        loadingIndicator.SetActive(true);
    }
    if (loadingText != null)
    {
        loadingText.text = $"Loading Sites for {organizationInfo?.Name}...";
    }

    Debug.Log($"WayfindingMapboxMapManager: Loading sites for '{organizationInfo?.Name}'.");
    var token = _cancellationTokenSource.Token;

    try
    {
        // Load all Sites for the selected Organization.
        var result = await sitesClientManager.GetSitesForOrganizationAsync(organizationInfo?.Id, token);
        if (token.IsCancellationRequested || loadVersion != _sitesLoadVersion)
        {
            // Ignore a response from an Organization that is no longer selected.
            return;
        }

        if (result.Status != SitesRequestStatus.Success)
        {
            Debug.LogError($"WayfindingMapboxMapManager: Failed to load Sites for {organizationInfo?.Name}.");
            return;
        }

        // Keep only Sites with map coordinates and a Production VPS asset with a non-empty payload.
        // In your own app, swap this filter for the asset rules your own wayfinding flow requires.
        var fetchTasks = result.Sites.Select(async site =>
        {
            // A Site without coordinates cannot be placed on this map.
            if (!site.HasLocation)
            {
                return null;
            }

            try
            {
                var assetsResult = await sitesClientManager.GetAssetsForSiteAsync(site.Id, token);
                if (assetsResult.Status != SitesRequestStatus.Success)
                {
                    return null;
                }

                foreach (var asset in assetsResult.Assets)
                {
                    if (asset.AssetType == AssetType.VpsInfo
                        && asset.Deployment == AssetDeploymentType.Production
                        && asset.VpsData.HasValue
                        && !string.IsNullOrWhiteSpace(asset.VpsData.Value.AnchorPayload))
                    {
                        return new Tuple<SiteInfo, AssetInfo>(site, asset);
                    }
                }
            }
            catch (Exception exception)
            {
                // One failed asset request should not discard every other Site result.
                if (!token.IsCancellationRequested)
                {
                    Debug.LogWarning(
                        $"WayfindingMapboxMapManager: Failed to load assets for '{site.Name}': {exception.Message}");
                }
            }

            return null;
        }).ToList();

        var fetchResults = await Task.WhenAll(fetchTasks);
        if (token.IsCancellationRequested || loadVersion != _sitesLoadVersion)
        {
            // Ignore a response from an Organization that is no longer selected.
            return;
        }

        foreach (var siteInfo in fetchResults)
        {
            if (siteInfo != null)
            {
                _sites.Add(siteInfo);
            }
        }

        Debug.Log($"WayfindingMapboxMapManager: Loaded {_sites.Count} VPS-ready sites.");

        if (_sites.Count > 0)
        {
            // Frame every loaded Site instead of hiding distant markers outside the viewport.
            FitMapToSites();
        }
        else
        {
            Debug.LogWarning($"WayfindingMapboxMapManager: No VPS-ready sites were found for '{organizationInfo?.Name}'.");
        }

        // Render the filtered Sites on the map after loading completes.
        TryRenderSites();
    }
    catch (Exception exception)
    {
        if (!token.IsCancellationRequested)
        {
            Debug.LogException(exception);
        }
    }
    finally
    {
        // Only the newest request owns the shared loading overlay.
        if (loadVersion == _sitesLoadVersion && loadingIndicator != null)
        {
            loadingIndicator.SetActive(false);
        }
    }
}
Validate this step:
- Build and run the app on a device, then finish sign-in.
- Wait for
WayfindingSitesMapto load. Confirm that the Organization dropdown replacesOption Awith the signed-in Organization name. - In the device log, confirm that
Loaded ... VPS-ready sitesappears. - Confirm that the loading overlay disappears after the Sites request completes, including when the selected Organization has no VPS-ready Sites.
- If more than one Organization is available, switch between them quickly. Confirm that the final pins belong to the last selected Organization and the loading overlay disappears. This validates that an older asynchronous response cannot overwrite the newest selection.
Render Site pins and select a Site
This step adds the marker prefab, the click helper, and the final marker-rendering code. It also wires the selected-Site panel so the user can choose a Site and launch WayfindingAR with that Site's anchor payload.
This step has five parts:
- Carry the selected Site into AR so the app can keep the selected Site name and payload across scene loads.
- Track the selected Site to store one Site and its VPS asset on each marker.
- Create the marker click helper to convert screen taps into Site marker hits.
- Render Site pins by replacing the temporary marker-rendering stub and adding scene navigation.
- Show the selected-Site panel so the user can launch
WayfindingARfor the selected Site.
Carry the selected Site into AR
Create Assets/Scripts/WayfindingSessionData.cs to carry the selected Site, payload, and Site coordinates into WayfindingAR:
Expand to view WayfindingSessionData.cs
public static class WayfindingSessionData
{
    // Keep the selected Site details alive while the app switches from the map scene to the AR scene.
    // In your own app, replace this static helper with your existing navigation or app state container.
    // This process-memory state is intentionally one-time and is not persistence or secure storage.
    public static string SiteName { get; private set; }
    public static string AnchorPayload { get; private set; }
    public static bool FromSitesMapNavigation { get; private set; }
    public static bool HasSiteLocation { get; private set; }
    public static double SiteLatitude { get; private set; }
    public static double SiteLongitude { get; private set; }

    public static void SetSelectedSite(
        string siteName,
        string anchorPayload,
        bool hasSiteLocation,
        double siteLatitude,
        double siteLongitude)
    {
        // Save the selected Site and payload so WayfindingAR can restore them after SceneManager.LoadScene().
        SiteName = siteName;
        AnchorPayload = anchorPayload?.Trim();
        HasSiteLocation = hasSiteLocation;
        SiteLatitude = siteLatitude;
        SiteLongitude = siteLongitude;
        FromSitesMapNavigation = true;
    }

    public static void Clear()
    {
        // Reset the stored selection after the AR scene reads it.
        SiteName = null;
        AnchorPayload = null;
        HasSiteLocation = false;
        SiteLatitude = 0d;
        SiteLongitude = 0d;
        FromSitesMapNavigation = false;
    }
}
Track the selected Site
Create Assets/Prefabs/WayfindingSiteMarker.prefab to render one Site marker on the map with the script you already created as follows:
- In the Hierarchy, create
GameObject > Create Emptyand name the new objectWayfindingSiteMarkerto hold one rendered Site. - Add
WayfindingSiteMarker.csas a component toWayfindingSiteMarkerto store the Site and VPS asset data. - With
WayfindingSiteMarkerstill selected, create3D Object > Quadand rename itMarkerQuadto draw a visible pin. - Rotate
MarkerQuadby setting Rotation in the Inspector toX = 90to face the map camera. - Add a
Box Collideras a component toMarkerQuadto make taps hit the marker. - With
MarkerQuadstill selected, dragAssets/Materials/PinMat.matto Element 0 in the Materials component under Mesh Renderer to style the pin. - In the Project window, create an
Assets/Prefabs/folder to store the reusable marker prefab. - Drag
WayfindingSiteMarkerfrom the Hierarchy intoAssets/Prefabs/to save it asWayfindingSiteMarker.prefabfor later map rendering. - Delete the temporary
WayfindingSiteMarkerobject from the Hierarchy after saving the prefab to keep the scene clean.
Create the marker click helper
Create Assets/Scripts/Map/WayfindingMapMarkerClickHandler.cs to route taps to the selected Site marker:
Expand to view WayfindingMapMarkerClickHandler.cs
using UnityEngine;

public class WayfindingMapMarkerClickHandler : MonoBehaviour
{
    // These references let the click helper translate a screen tap into a Site marker selection.
    // In your own app, replace them with the cameras and map manager your scene already uses.
    [SerializeField] private WayfindingMapboxMapManager mapManager;
    [SerializeField] private Camera mainCamera;
    [SerializeField] private Camera mapCamera;
    [SerializeField] private LayerMask markerLayerMask = ~0;

    private void Awake()
    {
        // Fail once with an actionable message instead of throwing on every screen tap.
        if (mapManager == null || mainCamera == null || mapCamera == null)
        {
            Debug.LogError(
                "WayfindingMapMarkerClickHandler: Assign Map Manager, Main Camera, and Map Camera.");
            enabled = false;
        }
    }

    private void Update()
    {
        // Ignore taps while the loading overlay or selected-Site panel is open.
        if (Input.GetMouseButtonDown(0) && mapManager != null && !mapManager.PopupOpen)
        {
            TriggerRaycast();
        }
    }

    private void TriggerRaycast()
    {
        // Convert the screen tap into a ray from the map camera.
        var viewportPoint = mainCamera.ScreenToViewportPoint(Input.mousePosition);
        var ray = mapCamera.ViewportPointToRay(viewportPoint);

        // This tutorial defaults to all layers. In your own app, put Site markers on a
        // dedicated physics layer and restrict Marker Layer Mask to avoid unrelated colliders.
        foreach (var hit in Physics.RaycastAll(ray, Mathf.Infinity, markerLayerMask))
        {
            // Each rendered marker carries one Site and one VPS asset through the WayfindingSiteMarker component.
            // GetComponentInParent keeps selection working if the marker prefab gains another child level.
            var marker = hit.collider.GetComponentInParent<WayfindingSiteMarker>();
            if (marker != null)
            {
                marker.OnClick();
                return;
            }
        }
    }
}
Render Site pins
Update Assets/Scripts/Map/WayfindingMapboxMapManager.cs as follows:
-
Replace the temporary
TryRenderSites()andFitMapToSites()stubs. The first method creates every filtered marker; the second centers and zooms the map so those markers fit inside a padded part of the viewport:Expand to view
TryRenderSites() and FitMapToSites()private void TryRenderSites()
{
if (siteMarkerPrefab == null || abstractMap == null)
{
return;
}
Debug.Log("WayfindingMapboxMapManager: Rendering site markers.");
foreach (var siteInfo in _sites)
{
// Place one marker at the Site coordinates returned by NSDK.
// CUSTOMIZE: Adjust the marker scale or prefab art for your map presentation.
var latLong = new Vector2d(siteInfo.Item1.Latitude, siteInfo.Item1.Longitude);
var markerObject = Instantiate(
siteMarkerPrefab,
abstractMap.GeoToWorldPosition(latLong, false),
Quaternion.identity);
var marker = markerObject.GetComponent<WayfindingSiteMarker>();
if (marker == null)
{
Debug.LogError(
"WayfindingMapboxMapManager: Site Marker Prefab must contain WayfindingSiteMarker on its root.");
Destroy(markerObject);
continue;
}
marker.transform.localScale = new Vector3(20f, 20f, 20f);
marker.Init(this, siteInfo);
_createdMarkers.Add(marker);
// Log the projected marker position so an off-screen or overlapping Site
// can be diagnosed without guessing whether it was instantiated.
var markerWorldPosition = marker.transform.position;
if (mapCamera != null)
{
var markerViewportPosition = mapCamera.WorldToViewportPoint(markerWorldPosition);
var isInsideViewport = markerViewportPosition.z > 0f
&& markerViewportPosition.x >= 0f
&& markerViewportPosition.x <= 1f
&& markerViewportPosition.y >= 0f
&& markerViewportPosition.y <= 1f;
Debug.Log(
$"WayfindingMapboxMapManager: Marker diagnostic site='{siteInfo.Item1.Name}', latitude={latLong.x:F6}, longitude={latLong.y:F6}, worldPosition={markerWorldPosition}, viewportPosition={markerViewportPosition}, insideViewport={isInsideViewport}.");
}
else
{
Debug.LogWarning(
$"WayfindingMapboxMapManager: Marker diagnostic site='{siteInfo.Item1.Name}', latitude={latLong.x:F6}, longitude={latLong.y:F6}, worldPosition={markerWorldPosition}, viewportPosition=unavailable because Map Camera is not assigned.");
}
}
Debug.Log($"WayfindingMapboxMapManager: Rendered {_createdMarkers.Count} site markers.");
}
private void FitMapToSites()
{
if (abstractMap == null || _sites.Count == 0)
{
return;
}
if (!_mapInitialized)
{
// Site loading can finish before Mapbox creates its placement strategy.
_hasPendingFitAllSites = true;
return;
}
// A completed fit supersedes an earlier location-based center that may still
// be waiting for Mapbox initialization.
_hasPendingMapCenter = false;
var minimumLatitude = double.PositiveInfinity;
var maximumLatitude = double.NegativeInfinity;
var minimumLongitude = double.PositiveInfinity;
var maximumLongitude = double.NegativeInfinity;
foreach (var siteInfo in _sites)
{
var site = siteInfo.Item1;
minimumLatitude = Math.Min(minimumLatitude, site.Latitude);
maximumLatitude = Math.Max(maximumLatitude, site.Latitude);
minimumLongitude = Math.Min(minimumLongitude, site.Longitude);
maximumLongitude = Math.Max(maximumLongitude, site.Longitude);
}
var center = new Vector2d(
(minimumLatitude + maximumLatitude) * 0.5d,
(minimumLongitude + maximumLongitude) * 0.5d);
if (_sites.Count == 1 || mapCamera == null)
{
abstractMap.UpdateMap(center, MaximumFitZoom);
Debug.Log(
$"WayfindingMapboxMapManager: Framed {_sites.Count} Site at center=({center.x:F6}, {center.y:F6}), zoom={MaximumFitZoom:F1}.");
return;
}
// Project at the closest zoom, then reduce zoom by powers of two until every
// Site fits inside a padded portion of the actual map viewport.
abstractMap.UpdateMap(center, MaximumFitZoom);
var minimumViewportX = float.PositiveInfinity;
var maximumViewportX = float.NegativeInfinity;
var minimumViewportY = float.PositiveInfinity;
var maximumViewportY = float.NegativeInfinity;
foreach (var siteInfo in _sites)
{
var site = siteInfo.Item1;
var worldPosition = abstractMap.GeoToWorldPosition(
new Vector2d(site.Latitude, site.Longitude),
false);
var viewportPosition = mapCamera.WorldToViewportPoint(worldPosition);
minimumViewportX = Mathf.Min(minimumViewportX, viewportPosition.x);
maximumViewportX = Mathf.Max(maximumViewportX, viewportPosition.x);
minimumViewportY = Mathf.Min(minimumViewportY, viewportPosition.y);
maximumViewportY = Mathf.Max(maximumViewportY, viewportPosition.y);
}
var projectedWidth = maximumViewportX - minimumViewportX;
var projectedHeight = maximumViewportY - minimumViewportY;
var widthScale = projectedWidth / FitViewportWidth;
var heightScale = projectedHeight / FitViewportHeight;
var requiredScale = Mathf.Max(1f, widthScale, heightScale);
var zoomReduction = Mathf.Ceil(Mathf.Log(requiredScale, 2f));
var fitZoom = Mathf.Clamp(
MaximumFitZoom - zoomReduction,
MinimumFitZoom,
MaximumFitZoom);
abstractMap.UpdateMap(center, fitZoom);
Debug.Log(
$"WayfindingMapboxMapManager: Framed {_sites.Count} Sites at center=({center.x:F6}, {center.y:F6}), zoom={fitZoom:F1}, projectedSpan=({projectedWidth:F2}, {projectedHeight:F2}).");
} -
Add
NavigateToArView()afterCloseSelectedSitePanel()so the selected-Site panel can openWayfindingARwith the selected payload:Expand to view
NavigateToArView()public void NavigateToArView()
{
if (_selectedSite == null)
{
Debug.LogError("NavigateToArView called with no Site selected.");
return;
}
var site = _selectedSite.Item1;
var asset = _selectedSite.Item2;
if (!asset.VpsData.HasValue || string.IsNullOrWhiteSpace(asset.VpsData.Value.AnchorPayload))
{
Debug.LogError($"Selected site '{site.Name}' does not have a production VPS anchor payload.");
return;
}
// Store the selected Site and coordinates before opening the AR scene.
// In your own app, replace this with your existing scene navigation or shared app-state handoff.
var payload = asset.VpsData.Value.AnchorPayload.Trim();
WayfindingSessionData.SetSelectedSite(
site.Name,
payload,
site.HasLocation,
site.Latitude,
site.Longitude);
Debug.Log($"WayfindingMapboxMapManager: Loading WayfindingAR for '{site.Name}' (payload length {payload.Length}).");
SceneManager.LoadScene(WayfindingSceneNames.WayfindingAR);
}
Show the selected-Site panel
Open Assets/Scenes/WayfindingSitesMap.unity and wire the selected-Site flow as follows:
- Select
MapboxManager, then dragAssets/Prefabs/WayfindingSiteMarker.prefabinto Site Marker Prefab to let the map manager render Site pins. - Add
WayfindingMapMarkerClickHandler.csas a component toMapboxManagerto route taps into the selected marker. - Drag
MapboxManagerinto Map Manager to let the click helper call back into the Sites manager. - In the Hierarchy, expand
XR Origin > Camera Offset, then drag the nestedMain Camerainto Main Camera to let the click helper read screen taps. - Expand
MapboxManager, then drag its childMapCamerainto Map Camera to let the click helper raycast against the rendered map markers. - In the
WayfindingMapMarkerClickHandlercomponent, confirm that Map Manager, Main Camera, and Map Camera are all filled and none showNone. Leave Marker Layer Mask set to Everything for this tutorial. In your own app, assign markers to a dedicated physics layer and select only that layer here. - Select
SitesCanvas/SelectedSitePopup/PopupBG/NavigateButton, then in Button > On Click() select+, dragMapboxManagerinto the newNone (Object)field, and chooseWayfindingMapboxMapManager > NavigateToArView()to store the selected payload and trigger theWayfindingARscene load. - Select
SitesCanvas/SelectedSitePopup/PopupBG/ClosePopup, then in Button > On Click() select+, dragMapboxManagerinto the newNone (Object)field, and chooseWayfindingMapboxMapManager > CloseSelectedSitePanel()to dismiss the selected-Site panel. - Save the scene to keep the selected-Site wiring.
Validate this step:
- Build and run on a device, finish sign-in, and validate the map.
- Confirm every VPS-ready Site is visible as a pin and the map is framed to include them.
- In the device log, confirm that
Rendered ... site markersreports the same count as the loaded VPS-ready Sites. - Tap a pin and confirm the popup shows a readable Site name and
VPS Asset Typewithout the Navigate button covering either line. TapXand confirm the popup closes.
In the vps2-wayfinding-sample sample, the equivalent implementations live in Assets/Scenes/SitesMap.unity, Assets/Scripts/Map/MapboxMapManager.cs, Assets/Scripts/Map/NsdkEditorMapLocation.cs, Assets/Scripts/Map/SiteMarker.cs, and Assets/Scripts/Map/MapMarkerClickHandler.cs.
Next steps
Continue to Start VPS2 localization to configure VPS2 tracking and start localization.