Start VPS2 localization
This page implements the Start VPS2 localization step in the wayfinding workflow. In this workflow, the user has already selected a Site on WayfindingSitesMap, passed its Production VPS anchor payload into the AR flow, and is ready to begin localization. This page shows how to open WayfindingAR, start VPS2 tracking, read AR and localization state, and surface that state in the scene UI.
VPS2 localization state and anchor tracking state are related but separate signals. Localization reports Unavailable, Coarse, or Precise; the Unity anchor reports None, Limited, or Tracking. This tutorial uses coarse and refined as UI descriptions only where the shown code explicitly evaluates those signals.
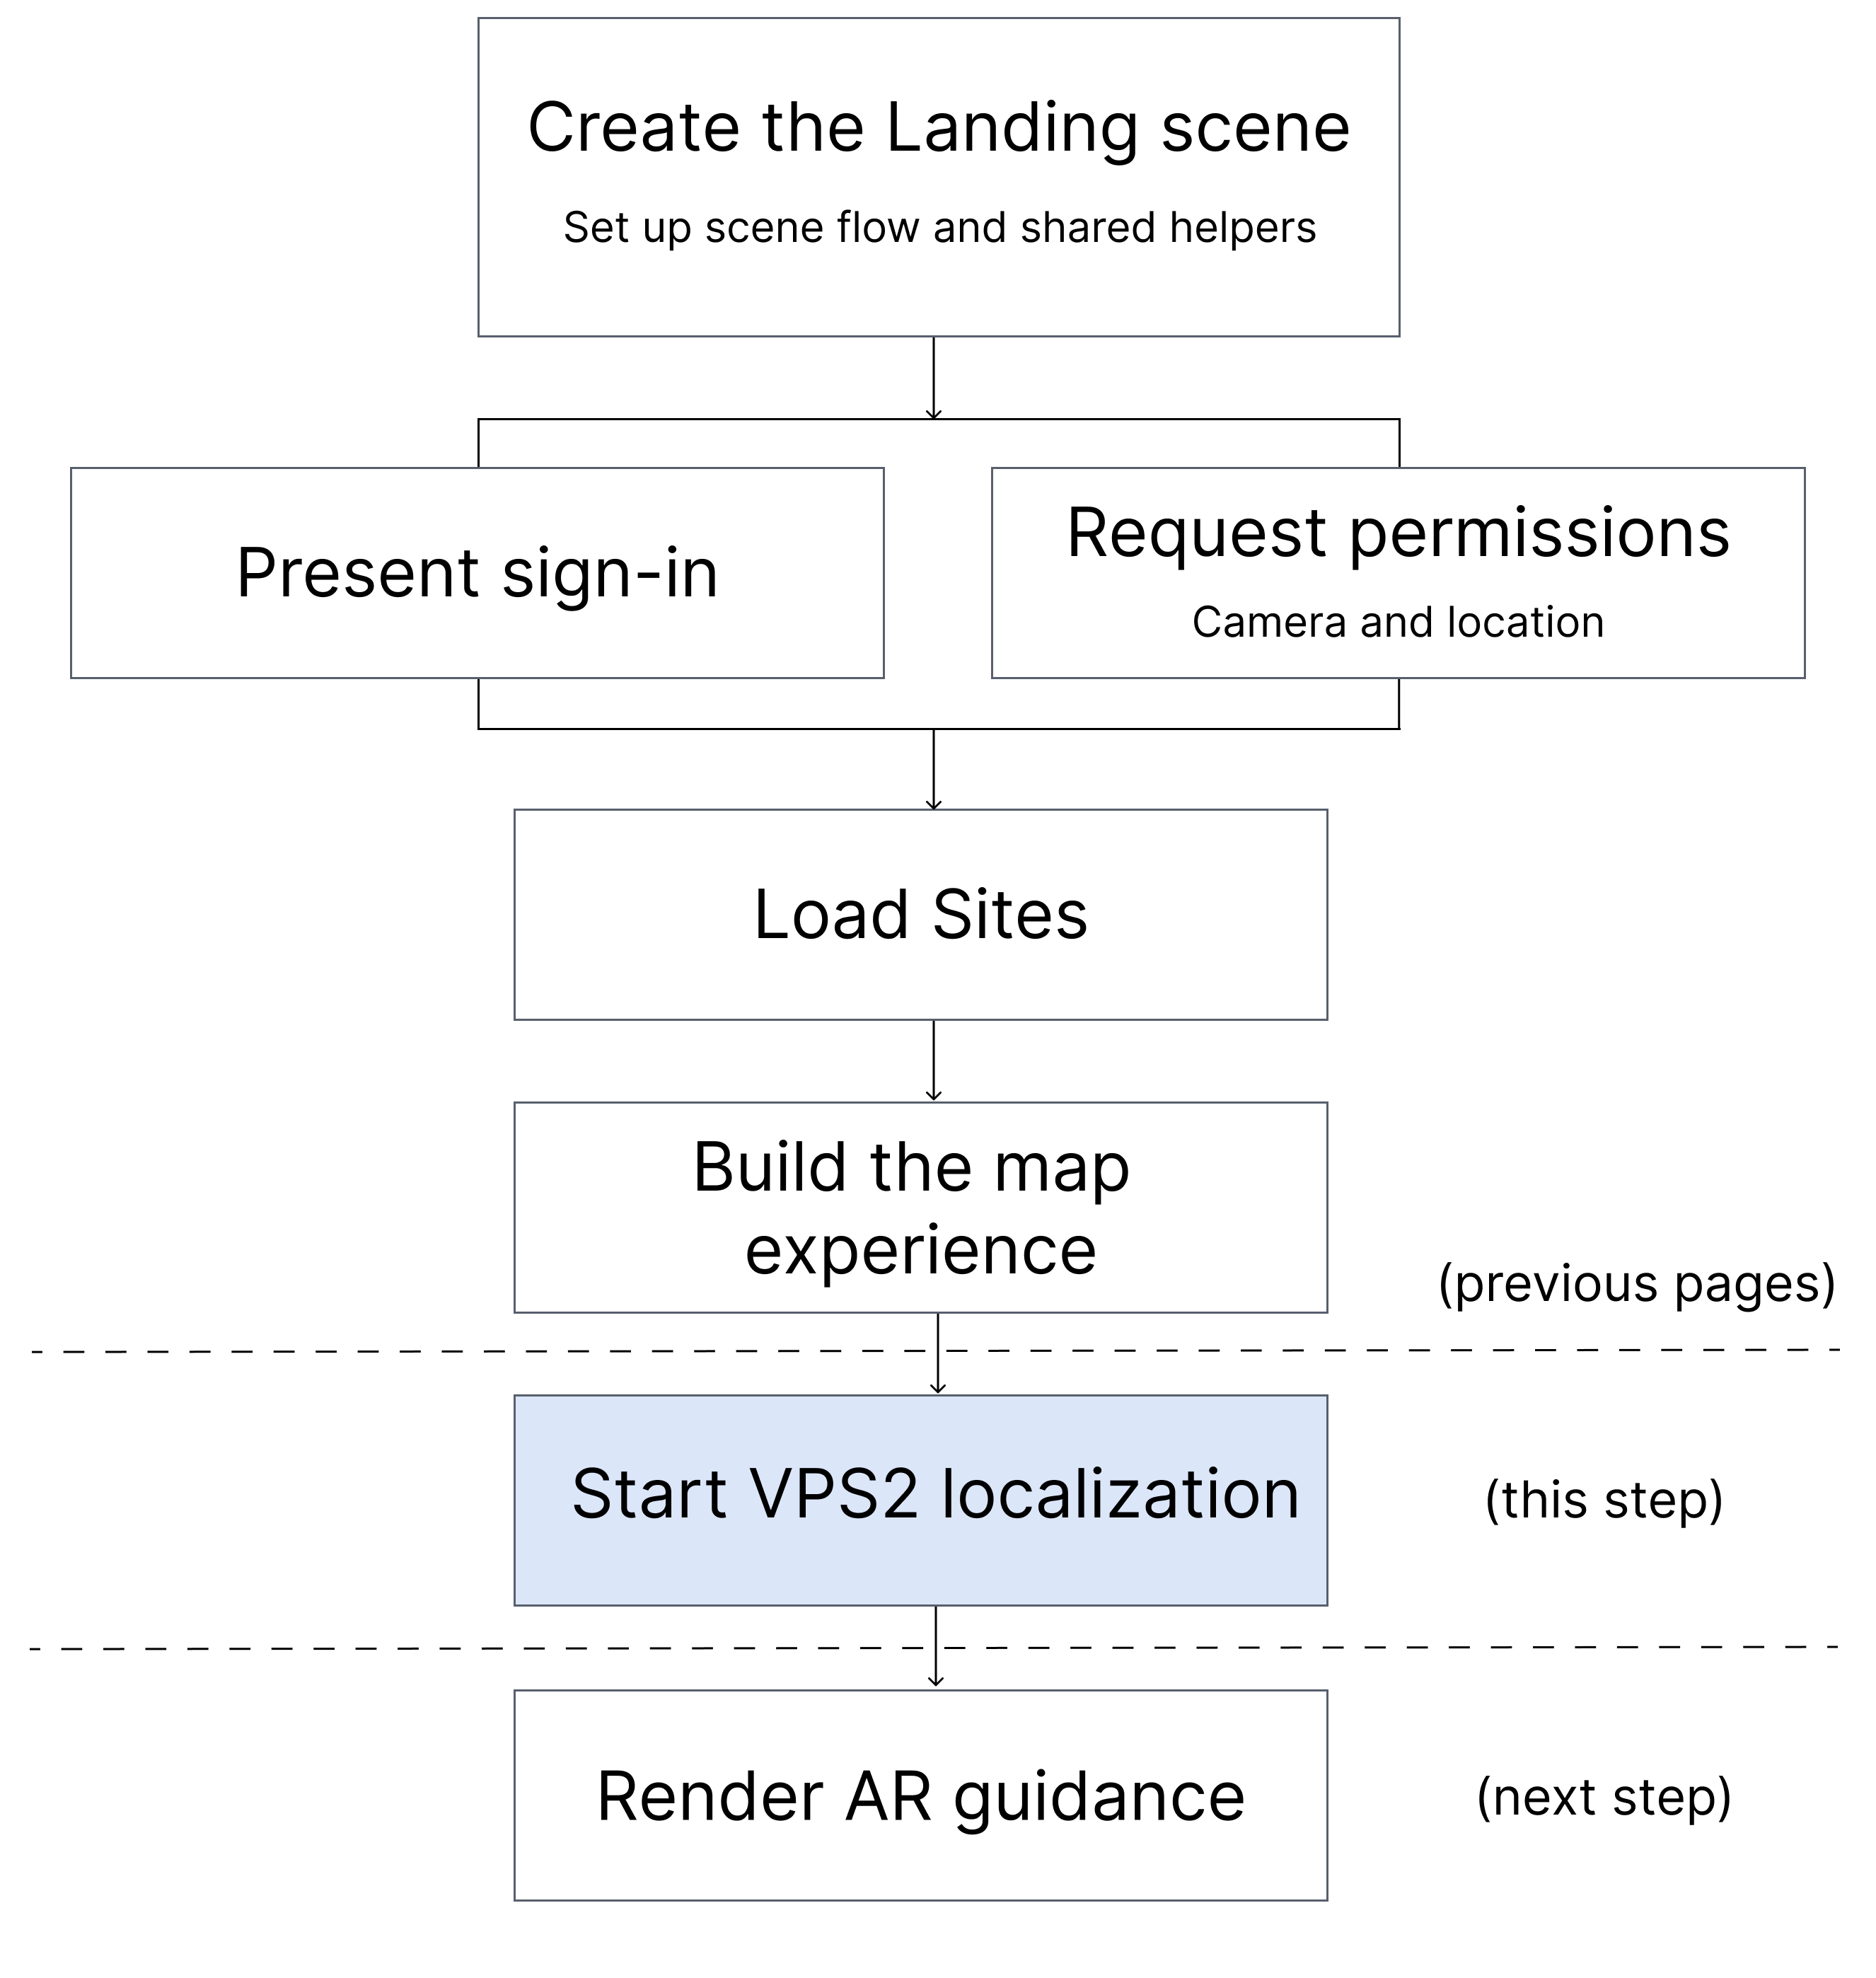
Figure: Start VPS2 localization opens WayfindingAR with the selected Production VPS payload, waits for the AR session to become ready, and reports localization state. Render AR guidance uses the resulting tracked pose for destination guidance and Site content.
This page has five sections:
- Create the AR screen so
WayfindingSitesMapcan open a dedicated AR scene. - Configure and start VPS2 tracking so the AR scene owns the
ARVps2Manager,ARSession, and selected payload. - Listen for anchor and localization updates so the scene manager can react to AR session and localization state changes.
- Start VPS2 tracking so the selected Site begins localization as soon as VPS2 is available.
- Surface VPS2 state in the AR UI so the scene shows the selected Site, session guidance, and localization status.
Files overview
In the standalone Unity app shown in this tutorial, Assets/Scenes/WayfindingAR.unity contains the AR Foundation objects, and Assets/Scripts/WayfindingAR/WayfindingARSceneManager.cs owns the selected Site, AR session state, and VPS2 localization startup used during this step.
Your app can organize those responsibilities in different files. The following table shows one working structure for the standalone Unity app in this tutorial and the matching files in the vps2-wayfinding-sample reference project.
| Responsibility | Standalone app | Sample reference |
|---|---|---|
| Create the AR screen | Assets/Scenes/WayfindingAR.unity and Assets/Scripts/WayfindingSceneNames.cs create the AR destination and add it to the shared scene list | Assets/Scenes/WayfindingAR.unity and Assets/Scripts/WayfindingScenes.cs |
| Configure and start VPS2 tracking | Assets/Scripts/WayfindingAR/WayfindingARSceneManager.cs and Assets/Scenes/WayfindingAR.unity configure the AR scene manager, ARVps2Manager, and AR scene wiring | Assets/Scripts/WayfindingAR/WayfindingManager.cs and Assets/Scenes/WayfindingAR.unity |
| Listen for anchor and localization updates | Assets/Scripts/WayfindingAR/WayfindingARSceneManager.cs reads ARSession and ARVps2Manager state and translates it into short status messages | Assets/Scripts/WayfindingAR/WayfindingManager.cs |
| Start VPS2 tracking | Assets/Scripts/WayfindingAR/WayfindingARSceneManager.cs reads WayfindingSessionData and starts VPS2 tracking for the selected payload | Assets/Scripts/WayfindingAR/WayfindingManager.cs and Assets/Scripts/WayfindingSessionData.cs |
| Surface VPS2 state in the AR UI | Assets/Scenes/WayfindingAR.unity and Assets/Scripts/WayfindingAR/WayfindingARSceneManager.cs show the selected Site, AR session guidance, localization status, and back navigation | Assets/Scenes/WayfindingAR.unity and Assets/Scripts/WayfindingAR/WayfindingManager.cs |
Create the AR screen
This step creates the initial WayfindingAR scene and adds it to the shared scene list. The previous page already wired Navigate to load WayfindingSceneNames.WayfindingAR, so this step only needs to create that destination scene and make it available to Unity.
This step has two parts:
- Set up the AR scene to add the AR Foundation scene objects and placeholder UI.
- Open the AR scene so the selected-Site panel can load
WayfindingAR.
Set up the AR scene
Create Assets/Scenes/WayfindingAR.unity to hold the AR localization flow as follows:
- In
Assets/Scenes/, create a new Scene namedWayfindingAR. - Open
WayfindingAR.unity. - In the
Gametab, open the aspect dropdown that usually saysFree Aspect, then choose1920x1080 Portrait. - Increase the
Scalevalue in the same toolbar until the preview text is easy to read while you position the UI. - Delete the default root
Main Camera.XR Origin (Mobile AR)creates the AR camera you will use for this page. - In the Hierarchy, select the scene name
WayfindingARso the next objects are created at the scene root. - In the Hierarchy, create
GameObject > XR > AR Sessionto add the AR session object. - In the Hierarchy, create
GameObject > XR > XR Origin (Mobile AR)to add theXR Origin,Camera Offset, and AR camera hierarchy. - Expand
XR Origin/Camera Offset/Main Camera, then selectMain Cameraand check the Inspector.AR Camera ManagerandAR Camera Backgroundare attached as components in the inspector even though they do not appear in the Hierarchy. - In the Hierarchy, create
GameObject > UI > Event Systemso the scene can receive button taps. - In the Hierarchy, create
GameObject > UI > Canvasto hold the AR overlay. Unity drives the rootCanvasRect Transform in Screen Space - Overlay mode, so you do not need to set its scale. - In
Canvas, createUI > Text - TextMeshProand name itSiteNameto show which Site opened the AR scene. - Select
SiteName, then update itsRect Transform:- Select the small square to the left of
Pos XandPos Yto open the anchor preset control, then choose the top-center preset that does not stretch. - Set
Pos Xto0. - Set
Pos Yto-115. - Set
Widthto620. - Set
Heightto90.
- Select the small square to the left of
- Set the
SiteNameText Input toSite Name, then set the font size to44, center alignment, andVertex Colorto white. - In
Canvas, createUI > Button - TextMeshProand name itBackButtonto return to the Sites map. - Select
BackButton, then update itsRect Transform:- Select the small square to the left of
Pos XandPos Y, then choose the top-left preset that does not stretch. This is the first box in the top row. - Set
Pos Xto100. - Set
Pos Yto-120. - Set
Widthto100. - Set
Heightto100.
- Select the small square to the left of
- Select
BackButton, then set itsImagecolor to black and A to56%alpha. - Expand
BackButton, select its childText (TMP), then update it as follows:- Set Text Input to
<. - Set the font size to
22. - Turn on
Auto Size. - Set
Minto10andMaxto80. - Set center alignment.
- Set
Vertex Colorto white.
- Set Text Input to
Validate this step:
- In the Game view,
Site Nameappears near the top of the screen andBackappears near the upper-left part of the screen. - At this checkpoint, the AR scene only shows those placeholder controls. The AR session guidance and localization status panels are added in a subsequent step.
Open the AR scene
Add WayfindingAR.unity to the shared scene list as follows:
- Open Build Profiles.
- Select Scene List.
- Drag
Assets/Scenes/WayfindingAR.unityfrom the Project window into the scene list so the built app can load the AR destination. - Enable the checkbox next to
Scenes/WayfindingAR.
Validate this step:
- Build and run the app on a device, finish sign-in, tap a Site pin, then tap Navigate.
- Confirm that
WayfindingARopens the live camera view with the placeholderSite Nameand<controls. At this checkpoint, the<button does not work and VPS2 tracking has not started. Later steps add that behavior.
Configure and start VPS2 tracking
This step creates the AR scene manager and wires it to AR Foundation and NSDK. It gives the scene one place to store the selected payload, back navigation, and the VPS2 objects that later steps will use for localization.
This step has two parts:
- Create a VPS2 manager to hold the AR scene references and localization stubs.
- Create the shared manager to connect the scene manager to
ARVps2Manager,ARSession, the camera, and the current UI.
Create a VPS2 manager
Create an Assets/Scripts/WayfindingAR/ folder, then create Assets/Scripts/WayfindingAR/WayfindingARSceneManager.cs to hold the AR scene state:
Expand to view WayfindingARSceneManager.cs
using System.Collections;
using NianticSpatial.NSDK.AR.VPS2;
using NianticSpatial.NSDK.AR.XRSubsystems;
using TMPro;
using UnityEngine;
using UnityEngine.SceneManagement;
using UnityEngine.UI;
using UnityEngine.XR.ARFoundation;
using UnityEngine.XR.ARSubsystems;

/// <summary>
/// Owns the Unity AR scene lifecycle for one selected Site. This component reads the
/// selected anchor payload, waits for AR Foundation and VPS2, starts anchor tracking,
/// and translates tracking state into scene UI.
///
/// In your own app, keep the AR Foundation and ARVps2Manager lifecycle calls, but replace
/// the tutorial's WayfindingSessionData, UI fields, status text, and scene navigation with
/// your app's state, presentation, and routing systems.
/// </summary>
public class WayfindingARSceneManager : MonoBehaviour
{
    [Header("VPS2")]
    // NSDK component that exposes the VPS2 subsystem and tracks the selected anchor.
    // Assign the ARVps2Manager attached to this scene's XR Origin.
    [SerializeField] private ARVps2Manager _arVps2Manager;

    [SerializeField]
    [Tooltip("Base64 anchor payload. Overridden when navigating from WayfindingSitesMap.")]
    // This tutorial fills the payload from WayfindingSessionData. In your own app,
    // replace that handoff with the payload supplied by your navigation or data layer.
    private string _anchorPayload;

    [Header("AR")]
    // AR Foundation references used to observe session and camera-frame state.
    // These can remain unchanged when your app uses the same AR Foundation scene layout.
    [SerializeField] private ARSession _arSession;
    [SerializeField] private ARCameraManager _arCameraManager;

    [Header("UI")]
    // Tutorial-specific scene UI. Replace these fields and the label-update helpers
    // when your app presents status through another canvas, view, or UI framework.
    [SerializeField] private TMP_Text _siteNameLabel;
    [SerializeField] private GameObject _sessionInfoPanel;
    [SerializeField] private TMP_Text _sessionInfoLabel;
    [SerializeField] private GameObject _sampleInfoPanel;
    [SerializeField] private TMP_Text _sampleInfoLabel;
    [SerializeField] private Button _backButton;

    // Runtime state for the current tracking request. ARVps2Manager owns the subsystem;
    // this component keeps the returned anchor so it can report coarse/refined state.
    private ARVps2Anchor _anchor;
    private bool _isLocalizing;
    private TrackingState _lastSessionTrackingState = (TrackingState)(-1);
    private string _lastSessionInfoMessage;
    private string _lastSampleInfoMessage;

    private void OnEnable()
    {
        // Listen while this scene is active so UI state follows AR session changes.
        ARSession.stateChanged += OnARSessionStateChanged;
        if (_arCameraManager != null)
        {
            _arCameraManager.frameReceived += OnCameraFrameReceived;
        }
    }

    private void OnDisable()
    {
        // Remove every listener registered by this component when the scene closes.
        ARSession.stateChanged -= OnARSessionStateChanged;
        if (_arCameraManager != null)
        {
            _arCameraManager.frameReceived -= OnCameraFrameReceived;
        }
        if (_backButton != null)
        {
            _backButton.onClick.RemoveListener(NavigateBackToSitesMap);
        }
    }

    private void Start()
    {
        Debug.Log("WayfindingARSceneManager: Opened WayfindingAR scene.");

        // Show a placeholder Site name until a later step reads the selected Site.
        // In your own app, replace this fallback with your normal loading or empty state.
        if (_siteNameLabel != null && string.IsNullOrWhiteSpace(_siteNameLabel.text))
        {
            _siteNameLabel.text = "Site Name";
        }

        // Wire the tutorial's Back button while the AR scene is open. Replace this
        // listener when your app routes navigation through another controller.
        if (_backButton != null)
        {
            _backButton.onClick.AddListener(NavigateBackToSitesMap);
        }

        // Hide the tutorial status panels until later steps start using them. Replace
        // this with your app's initial UI state if it does not use these panels.
        if (_sessionInfoPanel != null)
        {
            _sessionInfoPanel.SetActive(false);
        }
        if (_sampleInfoPanel != null)
        {
            _sampleInfoPanel.SetActive(false);
        }

        RefreshSessionInfoLabel();
        UpdateSampleInfoLabel(GetInfoMessage());
    }

    private IEnumerator StartLocalizationWhenReady()
    {
        // Later steps wait for ARVps2Manager to expose the VPS2 subsystem before tracking.
        // Keep this readiness boundary even if your app moves it into a tracking service.
        yield break;
    }

    private void StartLocalization()
    {
        // Later steps pass the selected anchor payload to ARVps2Manager.TryTrackAnchor.
        // Keep the NSDK tracking call; replace only where your app obtains the payload.
    }

    private void Update()
    {
        // Poll the lightweight localization state so the tutorial label stays current.
        // An app with reactive state can publish changes from its tracking service instead.
        UpdateSampleInfoLabel(GetInfoMessage());
    }

    private void OnARSessionStateChanged(ARSessionStateChangedEventArgs args)
    {
        RefreshSessionInfoLabel();
    }

    private void OnCameraFrameReceived(ARCameraFrameEventArgs args)
    {
        // Camera frames provide a reliable opportunity to observe AR tracking changes.
        // The frame pixels are not read or processed by this component.
        if (_arSession == null || _arSession.subsystem == null)
        {
            return;
        }

        var trackingState = _arSession.subsystem.trackingState;
        if (trackingState == _lastSessionTrackingState)
        {
            return;
        }

        _lastSessionTrackingState = trackingState;
        RefreshSessionInfoLabel();
    }

    private void RefreshSessionInfoLabel()
    {
        // Log only state changes, then mirror the current AR guidance into the tutorial UI.
        var message = GetSessionInfoMessage();
        if (message != _lastSessionInfoMessage)
        {
            _lastSessionInfoMessage = message;
            Debug.Log($"WayfindingARSceneManager: Session info '{message}'.");
        }

        if (_sessionInfoPanel == null || _sessionInfoLabel == null)
        {
            return;
        }

        _sessionInfoLabel.text = message;
        _sessionInfoPanel.SetActive(!string.IsNullOrEmpty(message));
    }

    private string GetSessionInfoMessage()
    {
        // Later steps replace this placeholder with reusable AR session-state checks.
        // In your own app, keep those checks but replace the returned text with your
        // product's user guidance or publish the state to your presentation layer.
        return string.Empty;
    }

    private void UpdateSampleInfoLabel(string text)
    {
        // Log only localization-state changes, then update the tutorial status panel.
        // Replace the TMP fields here if your app renders tracking state elsewhere.
        if (text != _lastSampleInfoMessage)
        {
            _lastSampleInfoMessage = text;
            Debug.Log($"WayfindingARSceneManager: Localization info '{text}'.");
        }

        if (_sampleInfoPanel == null || _sampleInfoLabel == null)
        {
            return;
        }

        _sampleInfoLabel.text = text;
        _sampleInfoPanel.SetActive(!string.IsNullOrEmpty(text));
    }

    private string GetInfoMessage()
    {
        // Later steps replace this placeholder with VPS2 localization-state checks.
        // Replace the returned strings, not the state checks, to match your app's UI.
        return "Not localized.";
    }

    private string GetPreLocalizationMessage()
    {
        // Later steps distinguish an active localization request from an idle scene.
        // Replace these user-facing strings with your app's status presentation.
        return "Not localized.";
    }

    private void ApplySelectedSiteFromSession()
    {
        // Later steps read the Site and payload from the tutorial's static session helper.
        // In your own app, replace WayfindingSessionData with your navigation arguments,
        // selected-Site repository, or other shared state container.
    }

    public void NavigateBackToSitesMap()
    {
        // Tutorial-specific cleanup and scene routing. Replace both calls when your app
        // owns selected-Site state or navigation through another system.
        WayfindingSessionData.Clear();
        SceneManager.LoadScene(WayfindingSceneNames.SitesMap);
    }
}
In the vps2-wayfinding-sample sample, the corresponding controller starts in Assets/Scripts/WayfindingAR/WayfindingManager.cs.
Create the shared manager
Open Assets/Scenes/WayfindingAR.unity and wire the AR scene manager as follows:
- Select the scene name
WayfindingARin the Hierarchy, then createGameObject > Create Emptyand name itWayfindingARControllerso the scene has one object to hold the AR scene manager component. - Select
WayfindingARController, then use Add Component to attachWayfindingARSceneManager.cs. - Select
XR Origin, then use Add Component to attachARVps2Manager. - Select
WayfindingARControlleragain. - Drag
XR Origininto AR Vps2 Manager so the scene manager can start VPS2 tracking and read localization state. - Drag
AR Sessioninto AR Session so the scene manager can read AR session state. - Drag
XR Origin/Camera Offset/Main Camerainto AR Camera Manager so the scene manager can respond to camera-frame and tracking updates. - Drag
Canvas/SiteNameinto Site Name Label so the scene manager can display the selected Site. - Drag
Canvas/BackButtoninto Back Button so the scene manager can register the return-to-map action. - Leave Session Info Panel, Session Info Label, Sample Info Panel, and Sample Info Label empty for now. A later step adds those scene objects.
- In the scene root, confirm that there is no separate default
Main Camera. Keep only the nestedXR Origin/Camera Offset/Main Camerathat ownsAR Camera ManagerandAR Camera Background.
Validate this step:
- Select
WayfindingARControllerand confirm that AR Vps 2 Manager, AR Session, AR Camera Manager, Site Name Label, and Back Button are assigned. The four status-panel fields should still showNoneat this checkpoint. - Build and run on a supported device, select a Site, and tap Navigate. Confirm that the live camera opens with the placeholder controls.
Listen for anchor and localization updates
This step replaces the placeholder status helpers in WayfindingARSceneManager.cs. It translates ARSession and ARVps2Manager state into short text strings that the scene will show later on this page.
This step has two parts:
- Collect AR session updates so the scene can describe why AR tracking is unavailable or limited.
- Collect localization updates so the scene can describe the current VPS2 localization state.
Collect AR session updates
Replace the placeholder private string GetSessionInfoMessage() function in Assets/Scripts/WayfindingAR/WayfindingARSceneManager.cs to describe the current AR session state:
Expand to view GetSessionInfoMessage()
private string GetSessionInfoMessage()
{
    // Keep these AR Foundation checks when adapting this controller. Replace the
    // returned strings if your app uses different guidance or a non-text status model.

    // Treat unsupported AR session states as unavailable.
    switch (ARSession.state)
    {
        case ARSessionState.None:
        case ARSessionState.Unsupported:
            return "Tracking unavailable.";
    }

    // Wait for the AR subsystem before reading tracking state.
    var subsystem = _arSession != null ? _arSession.subsystem : null;
    if (subsystem == null)
    {
        return "Initializing AR session...";
    }

    // Translate AR tracking state into short guidance text.
    switch (subsystem.trackingState)
    {
        case TrackingState.Tracking:
            return string.Empty;
        case TrackingState.None:
            return "Tracking unavailable.";
        case TrackingState.Limited:
            return ARSession.notTrackingReason switch
            {
                NotTrackingReason.ExcessiveMotion =>
                    "Tracking limited - Move the device more slowly.",
                NotTrackingReason.InsufficientFeatures or NotTrackingReason.InsufficientLight =>
                    "Tracking limited - Point the device at an area with visible surface detail, or improve lighting conditions.",
                NotTrackingReason.Initializing or NotTrackingReason.Relocalizing =>
                    "Initializing AR session.",
                _ => "Tracking unavailable.",
            };
        default:
            return string.Empty;
    }
}
Collect localization updates
Replace the placeholder private string GetInfoMessage() and private string GetPreLocalizationMessage() functions in Assets/Scripts/WayfindingAR/WayfindingARSceneManager.cs to describe the current localization state:
Expand to view GetInfoMessage() and GetPreLocalizationMessage()
private string GetInfoMessage()
{
    // Keep the following anchor and VPS2 state checks. In your own app, replace the
    // returned strings or publish an enum/state object to your presentation layer.

    // Read the tracked anchor state when an anchor already exists.
    if (_anchor != null)
    {
        switch (_anchor.trackingState)
        {
            case TrackingState.Limited:
                return "Tracking (coarse)";
            case TrackingState.Tracking:
                return "Tracking (refined)";
        }
    }

    // Read the latest VPS2 localization state before falling back.
    if (_arVps2Manager != null && _arVps2Manager.TryGetLatestLocalization(out var localization))
    {
        return localization.TrackingState switch
        {
            Vps2TrackingState.Coarse => "Tracking (coarse)",
            Vps2TrackingState.Precise => "Tracking (refined)",
            _ => GetPreLocalizationMessage(),
        };
    }

    return GetPreLocalizationMessage();
}

private string GetPreLocalizationMessage()
{
    // Show a pre-localization message until tracking becomes coarse or refined.
    // Replace these strings with the idle/loading states used by your own UI.
    if (_isLocalizing || (_anchor != null && _anchor.trackingState == TrackingState.None))
    {
        return "Localizing...";
    }

    return "Not localized.";
}
Validate this step:
- Let Unity compile the updated script and confirm that the Console has no red compiler errors. Localization remains
Not localizedat this checkpoint. You will validate coarse or refined tracking after completing the next section.
Start VPS2 tracking
This step reads the selected Site and payload from WayfindingSessionData, waits for ARVps2Manager to become ready, and starts tracking automatically.
This step has two parts:
- Load the selected Site so the AR scene reads the selected Site name and anchor payload.
- Start VPS2 localization so the scene begins tracking as soon as the subsystem is available.
Load the selected Site
Replace the placeholder private void ApplySelectedSiteFromSession() function in Assets/Scripts/WayfindingAR/WayfindingARSceneManager.cs to read the selected Site and payload:
private void ApplySelectedSiteFromSession()
{
    // WayfindingSessionData is the tutorial's cross-scene state container. In your
    // own app, replace this entire method with navigation arguments, a selected-Site
    // repository, or another state handoff that supplies the Site name and payload.

    // Read the selected Site only when WayfindingSitesMap launched this scene.
    if (!WayfindingSessionData.FromSitesMapNavigation)
    {
        return;
    }

    // Show the selected Site name in the AR scene.
    if (_siteNameLabel != null)
    {
        _siteNameLabel.text = WayfindingSessionData.SiteName;
    }

    // Copy the payload locally before clearing the tutorial's one-time handoff.
    _anchorPayload = WayfindingSessionData.AnchorPayload;
    WayfindingSessionData.Clear();
}
Start VPS2 localization
Replace private void Start(), private IEnumerator StartLocalizationWhenReady(), and private void StartLocalization() in Assets/Scripts/WayfindingAR/WayfindingARSceneManager.cs to start localization from the selected Site:
Expand to view Start() and localization helpers
private void Start()
{
    // Read the selected Site and anchor payload from WayfindingSitesMap. Replace this
    // method call when your app receives the payload from another state or routing layer.
    ApplySelectedSiteFromSession();

    // Initialize the tutorial UI. Replace this block if your app's view owns its
    // loading state, back action, or localization status presentation elsewhere.
    if (_siteNameLabel != null && string.IsNullOrWhiteSpace(_siteNameLabel.text))
    {
        _siteNameLabel.text = "Site Name";
    }

    if (_backButton != null)
    {
        _backButton.onClick.AddListener(NavigateBackToSitesMap);
    }

    if (_sessionInfoPanel != null)
    {
        _sessionInfoPanel.SetActive(false);
    }
    if (_sampleInfoPanel != null)
    {
        _sampleInfoPanel.SetActive(false);
    }

    RefreshSessionInfoLabel();
    UpdateSampleInfoLabel(GetInfoMessage());

    // Stop here when no anchor payload was passed from the Sites scene.
    if (string.IsNullOrEmpty(_anchorPayload))
    {
        Debug.LogWarning("WayfindingARSceneManager: No anchor payload. Select a Site on WayfindingSitesMap or set Anchor Payload in the Inspector.");
        return;
    }

    // Start location updates before waiting for VPS2. If your app already owns location
    // permissions and lifecycle, replace this block with that shared location service.
    if (Input.location.status is LocationServiceStatus.Stopped or LocationServiceStatus.Failed)
    {
        Input.location.Start();
    }

    // Wait for the VPS2 subsystem before starting localization.
    StartCoroutine(StartLocalizationWhenReady());
}

private IEnumerator StartLocalizationWhenReady()
{
    // Keep a bounded readiness wait so a missing VPS2 subsystem becomes a visible error.
    // An app-level tracking service can expose the same readiness behavior asynchronously.
    const float timeoutSeconds = 20f;
    var elapsed = 0f;
    _isLocalizing = true;

    // Wait until ARVps2Manager exposes the VPS2 subsystem.
    while (elapsed < timeoutSeconds)
    {
        if (_arVps2Manager != null && _arVps2Manager.subsystem != null)
        {
            StartLocalization();
            yield break;
        }

        elapsed += Time.unscaledDeltaTime;
        yield return null;
    }

    _isLocalizing = false;
    Debug.LogError("WayfindingARSceneManager: Timed out waiting for VPS2 subsystem.");
}

private void StartLocalization()
{
    // Track the selected anchor payload only once. Keep this guard if this method can
    // be reached more than once through scene or subsystem lifecycle events.
    if (_anchor != null)
    {
        return;
    }

    Debug.Log($"WayfindingARSceneManager: Tracking anchor for '{_siteNameLabel.text}' (payload length {_anchorPayload.Length}).");

    // TryTrackAnchor is the NSDK integration point to keep. In your own app, replace
    // the surrounding logging and state reporting, but pass the selected Site's
    // Production VPS anchor payload to this call.
    if (_arVps2Manager == null || !_arVps2Manager.TryTrackAnchor(_anchorPayload, out _anchor))
    {
        Debug.LogWarning("WayfindingARSceneManager: TryTrackAnchor failed; device geo-localization may still progress.");
        return;
    }
}
Validate this step:
- Build and run the app on a supported device, and finish sign-in.
- Tap a Site pin, then confirm that
SiteNamedisplays the selected Site. - Tap Navigate.
- Confirm the device log contains
Tracking anchor forusing the method for your build target:- Android: Run
adb logcat | grep "WayfindingARSceneManager"in a terminal. - iOS: Run the generated project on your device from Xcode, open the debug console, and filter for
WayfindingARSceneManager.
- Android: Run
Surface VPS2 state in the AR UI
This step adds the two status panels that show the current AR session guidance and VPS2 localization state in the AR scene.
This step has two parts:
- Show AR session guidance so the scene explains when AR tracking is limited or unavailable.
- Show localization status so the scene shows whether localization is unavailable, coarse, or refined.
Show AR session guidance
Open Assets/Scenes/WayfindingAR.unity and add the AR session guidance panel as follows:
- In
Canvas, createUI > Paneland name itSessionInfoPanelto hold AR session guidance. - Select
SessionInfoPanel, then update itsRect Transformto place the AR guidance after the title row:- Select the small square to the left of
Pos XandPos Y, then choose the top stretch preset. This is the last box in the top row, and it exposesLeftandRight. - Set
Pos Yto-255so session guidance does not overlap a long Site name. - Set
Heightto90. - Set
Leftto10. - Set
Rightto10.
- Select the small square to the left of
- Lower the
Imagealpha A onSessionInfoPanelto about60%so the camera view stays visible behind it. - In
SessionInfoPanel, createUI > Text - TextMeshProand name itSessionInfoTextto show AR session guidance. - Select
SessionInfoText, then update itsRect Transform:- Choose the full stretch preset.
- Set
Left,Right,Top, andBottomto16.
- Set the
SessionInfoTextfont size to28, center alignment, and white Vertex Color. - Set the
SessionInfoTextText Input toInitializing AR session.... - Select
WayfindingARController, then dragCanvas/SessionInfoPanelinto Session Info Panel andCanvas/SessionInfoPanel/SessionInfoTextinto Session Info Label so the scene manager can show or hide the panel and update its guidance text.
Show localization status
Continue in Assets/Scenes/WayfindingAR.unity and add the localization-status panel as follows:
- In
Canvas, createUI > Paneland name itSampleInfoPanelto hold localization status. - Select
SampleInfoPanel, then update itsRect Transformto separate the localization status from the title and top guidance:- Select the small square to the left of the position fields to open Anchor Presets.
- Choose the horizontal-stretch preset anchored to the bottom. Its icon has horizontal stretch arrows and anchor markers along the bottom edge, but no vertical stretch arrows.
- Confirm that the
Rect Transformnow showsLeft,Right,Pos Y, andHeight. If it showsTopandBottom, you selected a vertically stretched preset; reopen Anchor Presets and choose the bottom horizontal-stretch preset. - Set
Pos Yto280. - Set
Heightto200. - Set
Leftto25. - Set
Rightto25.
- Lower the
Imagealpha A onSampleInfoPanelto about70%so the camera view stays visible behind it. - In
SampleInfoPanel, createUI > Text - TextMeshProand name itSampleInfoTextto show localization status. - Select
SampleInfoText, then update itsRect Transform:- Choose the full stretch preset.
- Set
Left,Right,Top, andBottomto16.
- Set the
SampleInfoTextfont size to34, center alignment, and white text color. - Set the
SampleInfoTextText Input toNot localized.. - Select
WayfindingARController, then dragCanvas/SampleInfoPanelinto Sample Info Panel andCanvas/SampleInfoPanel/SampleInfoTextinto Sample Info Label so the scene manager can show the current VPS2 localization state.
Validate this step:
- Build and run the app on a supported device, finish sign-in, tap a Site pin, then tap Navigate.
- Confirm the bottom status changes from
Not localized.toLocalizing.... - In the device log, confirm that
WayfindingARSceneManager: Localization info 'Localizing...'appears.
In the vps2-wayfinding-sample sample, the equivalent implementations live in Assets/Scenes/WayfindingAR.unity, Assets/Scripts/WayfindingAR/WayfindingManager.cs, Assets/Scripts/WayfindingScenes.cs, and Assets/Scripts/WayfindingSessionData.cs.
Next step
Continue to Render AR guidance to render tracked-anchor content, expose precise-mode behavior, and add mesh-aligned AR content.