Initialize the app
This guide is the second part of a five-part series on creating a wayfinding experience that helps a user understand where they are, choose a destination, localize to that location, and follow AR guidance in the space. The first page, Set up the project, shows how to configure an existing project with the Niantic Spatial SDK (NSDK).
This section shows you how to initialize the wayfinding app in the following four steps:
- Create the Landing scene - create the first scenes and shared scene names for the wayfinding flow.
- Present sign-in - copy the sample auth helpers and create the auth endpoints asset they load.
- Request permissions - check and request required camera and location permissions.
- Load the Sites map - add the landing controller and load the placeholder
WayfindingSitesMapscene.
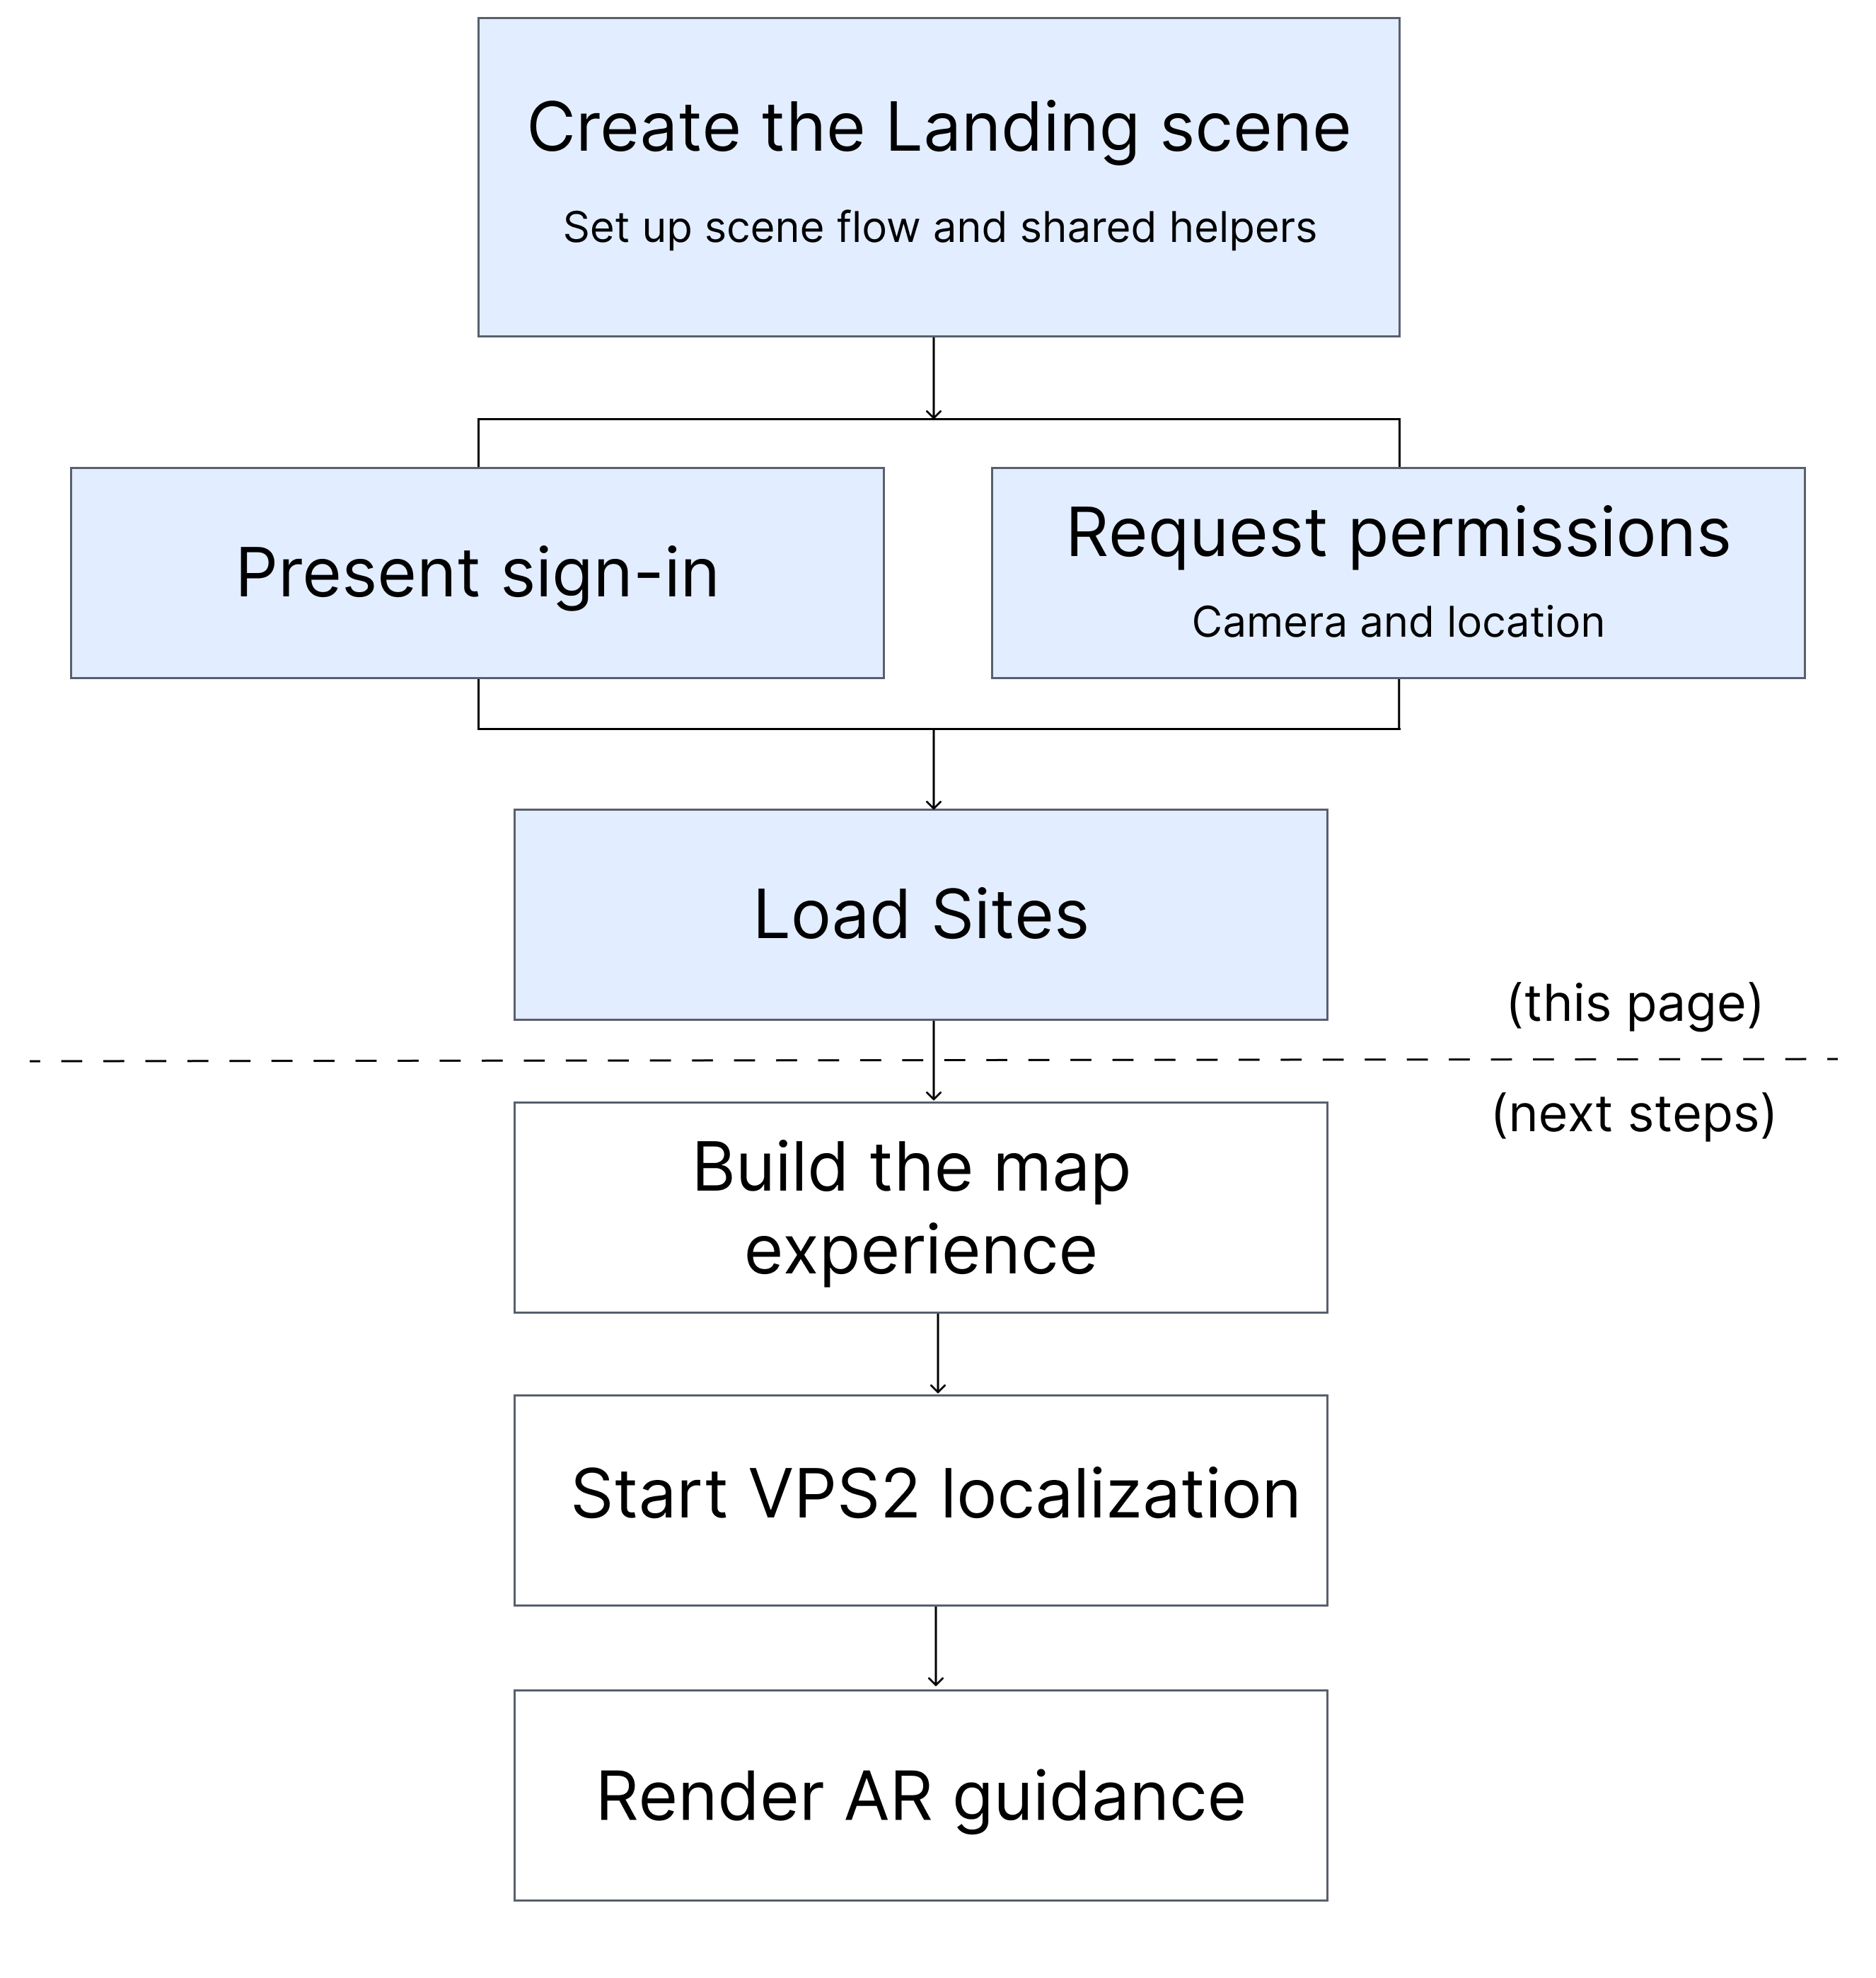
Figure: Initialize the app creates WayfindingLanding, handles sign-in and device permissions, and loads the placeholder WayfindingSitesMap scene. Build the map experience replaces that placeholder with the live Sites map and selection flow.
Files overview
The Unity landing step has four responsibilities:
- Create the Landing scene.
- Present sign-in.
- Request permissions.
- Load the Sites map.
Your app can organize those responsibilities in different files. The following table shows one working structure for the standalone Unity app in this tutorial and the matching files and scenes in the vps2-wayfinding-sample sample.
| Responsibility | Standalone app | Sample reference |
|---|---|---|
| Create the Landing scene | Assets/Scripts/WayfindingSceneNames.cs, Assets/Scenes/WayfindingLanding.unity, and Assets/Scenes/WayfindingSitesMap.unity create the landing flow and the next scene it opens | Assets/Scripts/WayfindingScenes.cs, Assets/Scenes/Landing.unity, and Assets/Scenes/SitesMap.unity |
| Present sign-in | Assets/Scripts/Auth/AuthEndpoints.cs, Assets/Scripts/Auth/AuthRequests.cs, Assets/Scripts/Auth/LoginManager.cs, Assets/Scripts/Auth/NSSampleSessionManager.cs, and Assets/Resources/Auth/WayfindingSignInEndpoints.asset restore a sample session or start sign-in | Assets/Scripts/Auth/AuthEndpoints.cs, Assets/Scripts/Auth/AuthRequests.cs, Assets/Scripts/Auth/LoginManager.cs, Assets/Scripts/Auth/NSSampleSessionManager.cs, and Assets/Resources/Auth/AuthProdEndpoints.asset |
| Request permissions | Assets/Scripts/WayfindingPermissionHelper.cs checks camera and location access | Assets/Scripts/PermissionHelper.cs |
| Load the Sites map | Assets/Scripts/Landing/WayfindingLandingController.cs updates the Landing UI and loads WayfindingSitesMap when sign-in and permissions are ready | Assets/Scripts/Landing/LandingController.cs |
Create the Landing scene
To create the app-entry part of the Unity wayfinding flow, set up the first scenes so the app opens one shared Landing scene. Later steps on this page reuse those scenes when they add sign-in, permissions, and the Sites scene transition.
There are two steps to create the Landing scene, shown in detail in the following sections:
- Create scene names for the landing flow.
- Create the Landing scene shell so later steps can wire the UI and controller.
Use the following steps to create or update the Landing scene:
Create scene names
Create a new empty C# script, Assets/Scripts/WayfindingSceneNames.cs to keep the scene names in one place:
// Keep scene identifiers in one place so scene transitions do not repeat string literals.
// In your own app, replace these constants with your scene names or routing abstraction.
public static class WayfindingSceneNames
{
    // Each value must exactly match an enabled scene in the Unity Scene List.
    public const string Landing = "WayfindingLanding";
    public const string SitesMap = "WayfindingSitesMap";
    public const string WayfindingAR = "WayfindingAR";
}
Create the Landing scene shell
Create the Landing and Sites scenes, make WayfindingLanding the first scene the app opens, and add the initial Landing layout and placeholder UI:
- Create two new empty scenes, and save them as
Assets/Scenes/WayfindingLanding.unityandAssets/Scenes/WayfindingSitesMap.unity. - Add both scenes to File > Build Profiles, with
WayfindingLandingfirst. - Copy the sample UI assets into your app so this scene can use the same icon and gradient resources. In the sample project, copy
Assets/Resources/UI/into your app atAssets/Resources/UI/, including each asset's.metafile. Do not place these files underAssets/TextMesh Pro/Resources/. - Open
Assets/Scenes/WayfindingLanding.unity, then build the Landing UI in four parts:- Create the full-screen Landing layout:
- In the Hierarchy for the open scene, create
UI > Canvasand rename itLandingCanvas. - In
LandingCanvas, in theCanvas Scalercomponent, setUI Scale ModetoScale With Screen Size,Reference Resolutionto1080 x 1920, andMatchto0.5. - In
LandingCanvas, selectCreate Emptyand name the newGameObjectUIContent. - With
UIContentselected, set its anchor preset to stretch full screen, then in theRect TransformsetLeft,Right,Top, andBottomto0so the layout can place the landing content across the screen. - With
UIContentselected, use Add Component in the Inspector to add aVertical Layout Group. - In the
Vertical Layout Group, setPadding > Topto300and setChild AlignmenttoUpper Centerto stack the landing content from the top. - In the same
Vertical Layout Group, clearControl Child SizeforWidthandHeight, clearUse Child ScaleforWidthandHeight, leaveChild Force Expandchecked forWidth, and clearChild Force ExpandforHeight.
- In the Hierarchy for the open scene, create
- Add the background and app branding:
- In
LandingCanvas, createUI > Imageand name itBackground. - With
Backgroundselected, set its anchor preset to stretch full screen, then in theRect TransformsetLeft,Right,Top, andBottomto0. - In the
Imagecomponent, setColorto HexadecimalFDFDFDand dragAssets/Resources/UI/GradientShaderintoMaterialto render the landing gradient. - In
UIContent, createUI > Raw Imageand name itIcon. - With
Iconselected, setWidthandHeightto750, dragAssets/Resources/UI/spatial-icon.pnginto theTexturefield so the landing screen displays the app icon, and setColorto HexadecimalA9B7FA. - Use Add Component to add a
Layout ElementtoIcon, then leave its values at the defaults.
- In
- Add the title and primary sign-in action:
- In
UIContent, createUI > Legacy > Textand name itTitleLabel. - With
TitleLabelselected, in theTextfield enterNiantic Spatial VPS2, add a blank line, and enterWayfinding Sample. - Set
Widthto900,Heightto210,Font Sizeto60,Font StyletoBold,Horizontal OverflowtoWrap,Vertical OverflowtoOverflow,Alignmentto centered,Best Fiton, andColorto Hexadecimal274CC6. - Use Add Component to add a
Layout ElementtoTitleLabel, then setPreferred Widthto900andLayout Priorityto2. - In
UIContent, createUI > Legacy > Buttonand name itPrimaryButton. - With
PrimaryButtonselected, setWidthto900,Heightto108, and in theImagecomponent setColorto Hexadecimal2563EB. - In the child
Textobject underPrimaryButton, set theTextfield toSign in to get started, setFont Sizeto36, setAlignmentto centered, and setColorto HexadecimalFFFFFF.
- In
- Add the message area for sign-in and permissions:
- In
UIContent, createUI > Legacy > Textand name itStatusLabel. - With
StatusLabelselected, clear theTextfield so it starts blank. - Set
Widthto800,Heightto280,Font Sizeto36,Alignmentto centered,Best Fiton,Horizontal OverflowtoWrap,Vertical OverflowtoOverflow, andColorto Hexadecimal1F2937. - Use Add Component to add a
Layout ElementtoStatusLabel, then setPreferred Widthto800andPreferred Heightto280.
- In
- Create the full-screen Landing layout:
Validate this step:
-
In the Game view, confirm that the landing screen shows the gradient background, the large icon, the blue two-line title, the blue sign-in button, and a blank area for status text following the button, as shown in the following image:

Present sign-in
This step adds the copied sign-in helper files, sign-in settings asset, and mobile browser callback settings that the Landing scene uses to start sign-in and restore a sample session.
This step has three parts:
- Copy the sign-in helper scripts from the sample.
- Create the sign-in endpoints asset that those scripts load at runtime.
- Register the mobile sign-in callback so browser sign-in can reopen the app.
Use the following steps to create or update your sign-in flow:
Copy the sign-in helper scripts
Copy the sample sign-in helpers and types used by the Landing controller:
- Create
Assets/Scripts/Auth/. - Copy
AuthEndpoints.cs,AuthRequests.cs,LoginManager.cs, andNSSampleSessionManager.csfrom the sample app'sAssets/Scripts/Auth/folder into your app. - Open
Assets/Scripts/Auth/LoginManager.csand change?redirectType=nsdk-externalto?redirectType=nsdk-samplesso the sign-in request matches the callback registered later on this page. - Let Unity finish recompiling before you continue.
Create the sign-in endpoints asset
Create Assets/Resources/Auth/WayfindingSignInEndpoints.asset to store the sign-in endpoint settings used by the Landing scene as follows:
- Create
Assets/Resources/Auth/. - In the new folder, create a scriptable object by selecting Create > Scriptable Objects > AuthEndpoints.
- Name the asset
WayfindingSignInEndpointssoResources.Load<AuthEndpoints>("Auth/WayfindingSignInEndpoints")can find it. - Leave the default endpoint values from the sample unless you have a different sign-in environment for your app.
Validate this step:
- Select
Assets/Resources/Auth/WayfindingSignInEndpoints.assetand make sure the Inspector shows editable sign-in endpoint fields instead of a missing script.
Register the mobile sign-in callback
Register the callback for the platform you plan to test:
- Android
- iOS
Update Assets/Plugins/Android/AndroidManifest.xml so Android can route nsdk-samples://signin back into the app:
- In the Unity Project window, create
Assets/Plugins/Android/if it does not already exist. - If
Assets/Plugins/Android/AndroidManifest.xmlalready exists, open it and update the activity that launches the Unity app. Keep the rest of the file as-is. - Add the following
VIEWintent filter to that activity so Android can reopen the app after sign-in:
<!-- Handle the browser callback that returns to the Unity app after sign-in. -->
<intent-filter>
  <action android:name="android.intent.action.VIEW" />
  <category android:name="android.intent.category.DEFAULT" />
  <category android:name="android.intent.category.BROWSABLE" />
  <!-- Match the callback URL used by LoginManager.cs: nsdk-samples://signin -->
  <data android:scheme="nsdk-samples" android:host="signin" />
</intent-filter>
- If you do not already have a manifest file, create
Assets/Plugins/Android/AndroidManifest.xmland use the following full example:
Expand to view AndroidManifest.xml
<?xml version="1.0" encoding="utf-8"?>
<manifest xmlns:android="http://schemas.android.com/apk/res/android"
    xmlns:tools="http://schemas.android.com/tools">
  <application>
    <!-- Launch the Unity player activity when the user opens the app. -->
    <activity
        android:name="com.unity3d.player.UnityPlayerGameActivity"
        android:theme="@style/BaseUnityGameActivityTheme"
        android:exported="true">
      <!-- Normal app launch from the launcher icon. -->
      <intent-filter>
        <action android:name="android.intent.action.MAIN" />
        <category android:name="android.intent.category.LAUNCHER" />
      </intent-filter>
      <!-- Browser callback that returns to the app after sign-in completes. -->
      <intent-filter>
        <action android:name="android.intent.action.VIEW" />
        <category android:name="android.intent.category.DEFAULT" />
        <category android:name="android.intent.category.BROWSABLE" />
        <!-- Match the callback URL used by LoginManager.cs: nsdk-samples://signin -->
        <data android:scheme="nsdk-samples" android:host="signin" />
      </intent-filter>
    </activity>
  </application>
</manifest>
Add the same URL scheme so iOS can route the browser sign-in callback back into the app:
- Open Project Settings.
- Select Player, then open the iOS tab.
- Add
nsdk-samplesto URL Schemes.
iOS uses that registered scheme to reopen the app after browser sign-in completes.
If you plan to build for both Android and iOS, complete both platform-specific callback settings before you test sign-in on each device type.
This callback setup is validated later when sign-in finishes in the browser and returns to the app on device.
Request permissions
This step adds one shared helper that checks camera and fine-location access before the Landing scene opens the Sites scene.
A developer token can satisfy sign-in for testing, but it does not grant camera or location access. This step still needs to complete before the app can open WayfindingSitesMap.
Create Assets/Scripts/WayfindingPermissionHelper.cs to check and request camera and location permissions:
Expand to view WayfindingPermissionHelper.cs
using System;
using System.Collections;
using UnityEngine;
#if UNITY_ANDROID
using UnityEngine.Android;
#endif

/// <summary>
/// Checks and requests the camera and location permissions required by the wayfinding flow.
/// Android uses runtime permission callbacks. iOS requests camera authorization and starts
/// Unity's location service, which triggers the location prompt when needed.
///
/// In your own app, replace this helper if permission ownership already lives in an app-level
/// service. Preserve the rule that both permissions complete before Sites or AR starts.
/// </summary>
public static class WayfindingPermissionHelper
{
    // Report permission state using the API for the active player platform.
    public static bool HasRequiredPermissions()
    {
#if UNITY_ANDROID && !UNITY_EDITOR
        return Permission.HasUserAuthorizedPermission(Permission.Camera)
            && Permission.HasUserAuthorizedPermission(Permission.FineLocation);
#elif UNITY_IOS && !UNITY_EDITOR
        return Application.HasUserAuthorization(UserAuthorization.WebCam)
            && Input.location.isEnabledByUser;
#else
        // Editor playback and spoofed-location validation do not use mobile permission prompts.
        return true;
#endif
    }

    public static void RequestRequiredPermissions(MonoBehaviour coroutineHost, Action<bool> onComplete)
    {
        if (HasRequiredPermissions())
        {
            onComplete?.Invoke(true);
            return;
        }

#if UNITY_ANDROID && !UNITY_EDITOR
        // Request missing permissions before the app opens the Sites scene.
        RequestNextMissingAndroidPermission(onComplete);
        return;
#elif UNITY_IOS && !UNITY_EDITOR
        // iOS authorization APIs are asynchronous, so use the Landing controller as
        // the coroutine host while the permission prompts are active.
        if (coroutineHost == null)
        {
            Debug.LogError("WayfindingPermissionHelper: An iOS coroutine host is required.");
            onComplete?.Invoke(false);
            return;
        }
        coroutineHost.StartCoroutine(RequestIosPermissions(onComplete));
        return;
#endif
        onComplete?.Invoke(HasRequiredPermissions());
    }

#if UNITY_ANDROID && !UNITY_EDITOR
    private static void RequestNextMissingAndroidPermission(Action<bool> onComplete)
    {
        if (HasRequiredPermissions())
        {
            onComplete?.Invoke(true);
            return;
        }

        var permission = !Permission.HasUserAuthorizedPermission(Permission.Camera)
            ? Permission.Camera
            : Permission.FineLocation;

        var callbacks = new PermissionCallbacks();
        callbacks.PermissionGranted += _ => RequestNextMissingAndroidPermission(onComplete);
        callbacks.PermissionDenied += _ => TryComplete(onComplete);
        callbacks.PermissionDeniedAndDontAskAgain += _ => TryComplete(onComplete);
        Permission.RequestUserPermission(permission, callbacks);
    }
#endif

#if UNITY_IOS && !UNITY_EDITOR
    private static IEnumerator RequestIosPermissions(Action<bool> onComplete)
    {
        // Request camera access before AR Foundation tries to open the camera.
        if (!Application.HasUserAuthorization(UserAuthorization.WebCam))
        {
            yield return Application.RequestUserAuthorization(UserAuthorization.WebCam);
        }

        if (!Application.HasUserAuthorization(UserAuthorization.WebCam))
        {
            onComplete?.Invoke(false);
            yield break;
        }

        // Starting the location service prompts for location access when it has not
        // already been granted. A real app can replace this with its shared location service.
        Input.location.Start();
        yield return null;

        const float timeoutSeconds = 20f;
        var elapsed = 0f;
        while (Input.location.status == LocationServiceStatus.Initializing && elapsed < timeoutSeconds)
        {
            elapsed += Time.unscaledDeltaTime;
            yield return null;
        }

        var locationReady = Input.location.isEnabledByUser
            && Input.location.status != LocationServiceStatus.Failed;
        onComplete?.Invoke(locationReady);
    }
#endif

    // Report the final permission state back to the Landing scene.
    private static void TryComplete(Action<bool> onComplete)
    {
        onComplete?.Invoke(HasRequiredPermissions());
    }
}
Load the Sites map
This step adds the Landing scene controller and a placeholder WayfindingSitesMap scene. The controller updates the Landing UI, starts sign-in when needed, requests permissions, and loads WayfindingSitesMap when both are ready. The next page replaces the placeholder scene with the real Sites map and Site selection flow.
This step has three parts:
- Create the landing controller for the Landing scene.
- Wire the Landing scene to that controller.
- Create the placeholder Sites scene so this page can validate the scene load.
Use the following steps to create or update the Sites scene transition:
Create the landing controller
Create Assets/Scripts/Landing/WayfindingLandingController.cs to manage the Landing UI, sign-in flow, permissions, and scene transition:
Expand to view WayfindingLandingController.cs
using NianticSpatial.NSDK.AR.Settings;
using NianticSpatial.NSDK.AR.Loader;
using NianticSpatial.NSDK.AR.Utilities.Auth;
using UnityEngine;
using UnityEngine.SceneManagement;
using UnityEngine.UI;

/// <summary>
/// Landing scene: OAuth sign-in, permissions, then navigate to Sites map.
/// </summary>
public class WayfindingLandingController : MonoBehaviour
{
    private const int MinUnexpiredTimeLeft = 60;

    // This asset points the sample login helpers at the sign-in environment.
    // Replace it if your app uses a different auth environment or endpoint set.
    [SerializeField]
    private AuthEndpoints signInEndpoints;

    // Replace this label and button with your own UI objects if your app uses a different Landing layout.
    [SerializeField]
    private Text statusLabel;

    [SerializeField]
    private Button primaryButton;

    // Editor-only deep-link override for testing browser callbacks without a device sign-in round trip.
    [SerializeField]
    [Tooltip("Optional: mock deep link URL when testing in the Unity Editor")]
    private string mockDeepLinkUrl;

    private bool _permissionsReady;
    private bool _permissionRequestAttempted;
    private bool _navigating;

    private void Awake()
    {
        Debug.Log("WayfindingLandingController: Landing scene opened.");

        // Load the sign-in settings asset this tutorial created under Resources/Auth/.
        // If your app injects auth settings another way, replace this Resources.Load call.
        if (signInEndpoints == null)
        {
            signInEndpoints = Resources.Load<AuthEndpoints>("Auth/WayfindingSignInEndpoints");
        }

        // Register those settings with the shared sample auth helpers.
        signInEndpoints?.SetAsSettings();

#if UNITY_EDITOR
        if (!string.IsNullOrEmpty(mockDeepLinkUrl))
        {
            // Editor-only shortcut that simulates the browser callback URL.
            LoginManager.MockDeepLink(mockDeepLinkUrl);
        }
#endif

        // Restore the sample auth session, then publish it to NSDK before any SitesClientManager
        // request can run. This ordering is what makes the NSDK context available in SitesMap.
        // In your own app, replace both calls with your auth/session bootstrap, but preserve the
        // requirement that NSDK session access is configured before loading the Sites scene.
        NSSampleSessionManager.Start();
        NSSampleSessionManager.SetupSessionAccess();

#if !UNITY_EDITOR
        if (!string.IsNullOrEmpty(Application.absoluteURL))
        {
            // Handle the real mobile callback URL after the browser sign-in flow returns to the app.
            LoginManager.MockDeepLink(Application.absoluteURL);
        }
#endif
    }

    private void OnEnable()
    {
        // Subscribe to the sample auth events so the Landing UI refreshes when sign-in finishes or logout occurs.
        // Replace these with your app's auth events if you do not use LoginManager.cs.
        LoginManager.LoginComplete += OnLoginComplete;
        LoginManager.LogoutComplete += OnAuthStateChanged;

        if (primaryButton != null)
        {
            primaryButton.onClick.AddListener(OnPrimaryButtonClicked);
        }
    }

    private void OnDisable()
    {
        LoginManager.LoginComplete -= OnLoginComplete;
        LoginManager.LogoutComplete -= OnAuthStateChanged;

        if (primaryButton != null)
        {
            primaryButton.onClick.RemoveListener(OnPrimaryButtonClicked);
        }
    }

    private void Start()
    {
        if (statusLabel == null || primaryButton == null)
        {
            Debug.LogError(
                "WayfindingLandingController: Assign Status Label and Primary Button from the Landing scene.");
            return;
        }

        Debug.Log("WayfindingLandingController: Landing UI is ready.");
        RefreshUi();
        BeginPermissionFlow();
    }

    private void BeginPermissionFlow()
    {
        // Request permissions before the scene loads WayfindingSitesMap.
        if (WayfindingPermissionHelper.HasRequiredPermissions())
        {
            Debug.Log("WayfindingLandingController: Permissions already granted.");
            _permissionsReady = true;
            TryAdvance();
            return;
        }

        Debug.Log("WayfindingLandingController: Waiting for camera and location permissions.");
        RefreshPermissionUi();
    }

    private void OnPrimaryButtonClicked()
    {
        // Use the same button for permissions first, then sign-in after permissions are granted.
        if (!_permissionsReady)
        {
            Debug.Log("WayfindingLandingController: Permissions button pressed.");
            OnRequestPermissionsClicked();
            return;
        }

        if (IsAuthenticated())
        {
            Debug.Log("WayfindingLandingController: Sign-in button ignored because auth is already ready.");
            return;
        }

        if (LoginManager.IsLoginInProgress)
        {
            Debug.Log("WayfindingLandingController: Sign-in cancelled.");
            // Sample login helpers support cancelling the in-progress browser flow.
            LoginManager.CancelLoginRequested();
            RefreshUi();
            return;
        }

        Debug.Log("WayfindingLandingController: Sign-in requested.");
        // Replace this with your own sign-in entry point if your app does not use LoginManager.cs.
        LoginManager.LoginRequested();
        RefreshUi();
    }

    private void OnRequestPermissionsClicked()
    {
        _permissionRequestAttempted = true;
        statusLabel.text = "Requesting permissions…";
        Debug.Log("WayfindingLandingController: Requesting camera and location permissions.");
        // Pass this controller as the coroutine host for the iOS permission flow.
        WayfindingPermissionHelper.RequestRequiredPermissions(this, granted =>
        {
            _permissionsReady = granted;
            if (granted)
            {
                Debug.Log("WayfindingLandingController: Permissions granted.");
                RefreshUi();
                TryAdvance();
            }
            else
            {
                Debug.LogWarning("WayfindingLandingController: Permissions were not granted.");
                RefreshPermissionUi();
            }
        });
    }

    private void RefreshPermissionUi()
    {
        if (statusLabel == null || primaryButton == null)
        {
            return;
        }

        // This tutorial intentionally uses legacy Unity UI Text. If your button uses
        // TextMeshPro, change this lookup and the serialized label types to TMP_Text.
        var buttonText = primaryButton.GetComponentInChildren<Text>();
        primaryButton.gameObject.SetActive(true);
        primaryButton.interactable = true;

        if (_permissionRequestAttempted)
        {
            statusLabel.text =
                "Permissions are required. Enable camera and location in system settings.";
            if (buttonText != null)
            {
                buttonText.text = "Try again";
            }
        }
        else
        {
            statusLabel.text = "Camera and location access are required for AR wayfinding.";
            if (buttonText != null)
            {
                buttonText.text = "Grant permissions";
            }
        }
    }

    private void OnLoginComplete()
    {
        Debug.Log("WayfindingLandingController: Sign-in completed.");
        TryAdvance();
    }

    private void OnAuthStateChanged()
    {
        Debug.Log("WayfindingLandingController: Auth state changed.");
        RefreshUi();
    }

    private void TryAdvance()
    {
        // Open the next scene only after permissions and sign-in are both ready.
        if (_navigating || !_permissionsReady || !IsAuthenticated())
        {
            Debug.Log(
                $"WayfindingLandingController: Waiting to load SitesMap (permissionsReady={_permissionsReady}, authenticated={IsAuthenticated()}, navigating={_navigating}).");
            RefreshUi();
            return;
        }

        _navigating = true;
        Debug.Log("WayfindingLandingController: Loading WayfindingSitesMap.");
        // Replace this with your app's next scene if you use a different scene flow after Landing.
        SceneManager.LoadScene(WayfindingSceneNames.SitesMap);
    }

    private bool IsAuthenticated()
    {
        // Developer-token path used by this tutorial for simple local testing.
        // Remove or replace this branch if your app should always use interactive sign-in.
        if (!string.IsNullOrEmpty(NsdkSettings.Instance.AccessTokenOverride))
        {
            return true;
        }

        // Refresh-token path used by the copied sample auth helpers.
        // Replace this with your own session-validity check if your app stores auth differently.
        if (NsdkSettings.Instance.UseDeveloperAuthentication
            && !AuthPublicUtils.IsEmptyOrExpiring(NsdkSettings.Instance.RefreshToken, MinUnexpiredTimeLeft))
        {
            return true;
        }

        // Final fallback: ask the copied LoginManager whether sign-in already completed.
        return LoginManager.IsLoggedIn;
    }

    private void RefreshUi()
    {
        if (statusLabel == null || primaryButton == null)
        {
            return;
        }

        if (!_permissionsReady)
        {
            RefreshPermissionUi();
            return;
        }

        // Keep this component type consistent with the text component under PrimaryButton.
        // A TextMeshPro-based app should use GetComponentInChildren<TMP_Text>() instead.
        var buttonText = primaryButton.GetComponentInChildren<Text>();

        if (IsAuthenticated())
        {
            statusLabel.text = "Signed in. Opening site map…";
            primaryButton.gameObject.SetActive(false);
            return;
        }

        primaryButton.gameObject.SetActive(true);

        if (LoginManager.IsLoginInProgress)
        {
            statusLabel.text = "Complete sign-in in your browser, then return to this app.";
            if (buttonText != null)
            {
                buttonText.text = "Cancel sign-in";
            }
        }
        else
        {
            statusLabel.text = "Sign in with your Niantic Spatial account to load your Sites.";
            if (buttonText != null)
            {
                buttonText.text = "Sign in to get started";
            }
        }

        primaryButton.interactable = true;
    }
}
Wire the Landing scene
Open Assets/Scenes/WayfindingLanding.unity and update it as follows:
- In the Hierarchy, create an empty
GameObjectby selectingCreate Empty, then name itWayfindingLandingController. - With
WayfindingLandingControllerselected, use Add Component in the Inspector to attachWayfindingLandingController.cs. - Drag the
StatusLabelobject fromLandingCanvas/UIContentinto Status Label so the controller can display permission and sign-in state. - Drag the
PrimaryButtonobject fromLandingCanvas/UIContentinto Primary Button so the controller can handle the current permission or sign-in action. - Leave Sign In Endpoints empty. You can change this field to use different sign-in settings, but that is outside the scope of this guide.
- Leave Mock Deep Link Url empty. You can set this field to test a mock browser callback in the Unity Editor, but that is outside the scope of this guide.
Validate this step:
- Select
WayfindingLandingControllerin the Hierarchy and press Play. - The Landing screen now shows the permission message and the
Grant permissionsbutton instead of the blank status area from the previous step.
Create the placeholder Sites scene
Open Assets/Scenes/WayfindingSitesMap.unity and update it as follows:
- In the Hierarchy, create
UI > Canvasand rename itSitesCanvas. - In
SitesCanvas, createUI > Text - TextMeshProand rename itSelectedSiteTitle. - Set the Text Input value to
Temporary Sites screen, and theVertex Colorto010101. - Save the scene.
Validate this step:
- To validate the first-run permission path again, uninstall the existing device build or clear its camera and location permissions, then build and run the app on the device.
- Confirm that the Landing screen shows
Grant permissions. - Tap
Grant permissionsand confirm that the device requests both camera and location access. Allow both permissions. - After you allow camera and location access, the Landing screen shows
Sign in to get started. - Complete sign-in on the device.
- Confirm that
WayfindingSitesMapopens after sign-in completes and shows the temporaryTemporary Sites screenlabel. - In the device log—Logcat on Android or Xcode's console on iOS—confirm that
WayfindingLandingController: Loading WayfindingSitesMapappears.
In the vps2-wayfinding-sample sample app, the full reference implementation for this landing flow lives across Assets/Scripts/WayfindingScenes.cs, Assets/Scripts/Auth/AuthRequests.cs, Assets/Scripts/Auth/LoginManager.cs, Assets/Scripts/Auth/NSSampleSessionManager.cs, Assets/Scripts/PermissionHelper.cs, and Assets/Scripts/Landing/LandingController.cs.
Next step
Continue to Build the map experience to build the WayfindingSitesMap scene, load real Sites, and pass the selected anchor payload into the AR scene.