Scan with a 360 camera
This guide explains how to capture high-quality 360 scans with Scaniverse, from preparing the scene and configuring your camera to capturing, uploading, and processing scans into meshes and Gaussian splats. It also covers supported cameras, recommended capture techniques, and troubleshooting common issues.
Scaniverse supports 360 video files only, including .insv and equirectangular .mp4. Still panoramic images (.jpg, .png, etc.) are not supported.
Workflow
A typical 360 camera workflow includes the following steps:
- Choose a supported 360 camera.
- Configure your camera:
- If you're capturing outdoors, set your exposure to Auto.
- If you're indoors, set the shutter speed to 1/500 and ISO to Auto.
- Capture the scan by walking the perimeter, then filling the interior with overlapping passes.
- Transfer your video to a desktop computer using an SD card, USB cable, or other supported method.
- Upload your scan to Scaniverse Web.
- Process and download the resulting asset.
Table of contents
Follow the guide from start to finish, or use the following table of contents to navigate directly to a specific step in the workflow.
- Overview - Learn when to use a 360 camera and how it differs from mobile capture.
- Requirements - Review the supported hardware, software, and account requirements.
- Supported cameras and video formats - Find supported cameras and learn which file formats can be uploaded directly.
- Scene setup - Prepare the environment, optimize lighting, and set up metric scale calibration.
- Capture a scan - Configure your camera and follow recommended capture techniques.
- Upload and process scans - Prepare files, upload your scan, and generate assets.
- Troubleshooting and FAQ - Resolve common issues and find answers to frequently asked questions.
Overview
A 360 camera captures the entire environment at once using two lenses that each record slightly more than 180°. The camera stitches these feeds together so you can view the full surroundings in every direction simultaneously as shown in the following video:
A 360 camera is:
- Efficient: Capturing an environment with a 360 camera is roughly three times faster than using a mobile phone.
- Immersive: The camera captures the entire environment—floor to ceiling—at once, producing 3D assets that feel complete and immersive.
- Easy to use: The camera sees in all directions simultaneously, which significantly reduces the chance of leaving holes or blind spots in your scan.
- Ideal for large areas: The combination of speed and full-environment capture makes 360 cameras especially well suited for digitizing large spaces such as marinas, parks, and large indoor facilities.
- Limited in duration: Plus supports up to 5-minute videos, and Pro supports up to 10-minute videos for 360 camera uploads.
Requirements
- A supported 360 camera.
- A desktop computer for uploading your scan.
- A Pro or Plus Scaniverse account with available credits.
Supported cameras and video formats
Scaniverse supports 360 video uploads in two formats, depending on your camera.
| Camera type | Upload format | Preparation required |
|---|---|---|
| Insta360 X5, X4 Air, or X4 | Raw .insv | Upload directly from the SD card. No stitching or conversion required. |
| Other 360 cameras | Stitched equirectangular .mp4 | Export the video from the camera manufacturer's desktop software before uploading. |
Commonly used cameras that use the .mp4 workflow include:
- Insta360 X3 and One RS 1-inch 360
- Ricoh Theta X and Theta Z1
- GoPro Max 2
- DJI Osmo 360
- 360 drones such as Antigravity A1 and DJI Avata 360
Insta360 cameras record both .INSV and .LRV files. Upload the original .INSV files. The .LRV files are low-resolution preview files and are not used for processing.
Scene setup
Prepare the scene before capturing by optimizing lighting, minimizing moving people, and setting up optional metric scale calibration.
Environment and lighting
- Capture in well-lit, evenly lit environments whenever possible.
- Avoid strong shadows, direct sunlight, and rapidly changing lighting conditions.
- Good lighting produces sharper frames and improves reconstruction quality.
People in the scene
For best results, capture the scene when it is empty.
If people are present:
- People who remain stationary may appear as incomplete or distorted geometry in the final reconstruction.
- People who are moving are more likely to be removed during processing.
Metric scale calibration
To enable real-world scale:
- Download the calibration board US Letter | A4 and print it at 100% scale.
- Place the board flat on the floor where you will begin scanning.
- Start recording with one 360 camera lens positioned 30–50 cm from the board.
- Slowly circle the 360 camera around the board while keeping the board clearly visible and in focus for the first 30 seconds.
- Continue scanning the environment as usual.
The following video demonstrates how to capture the calibration board:
The following image shows how to start recording with the calibration board visible to the camera:
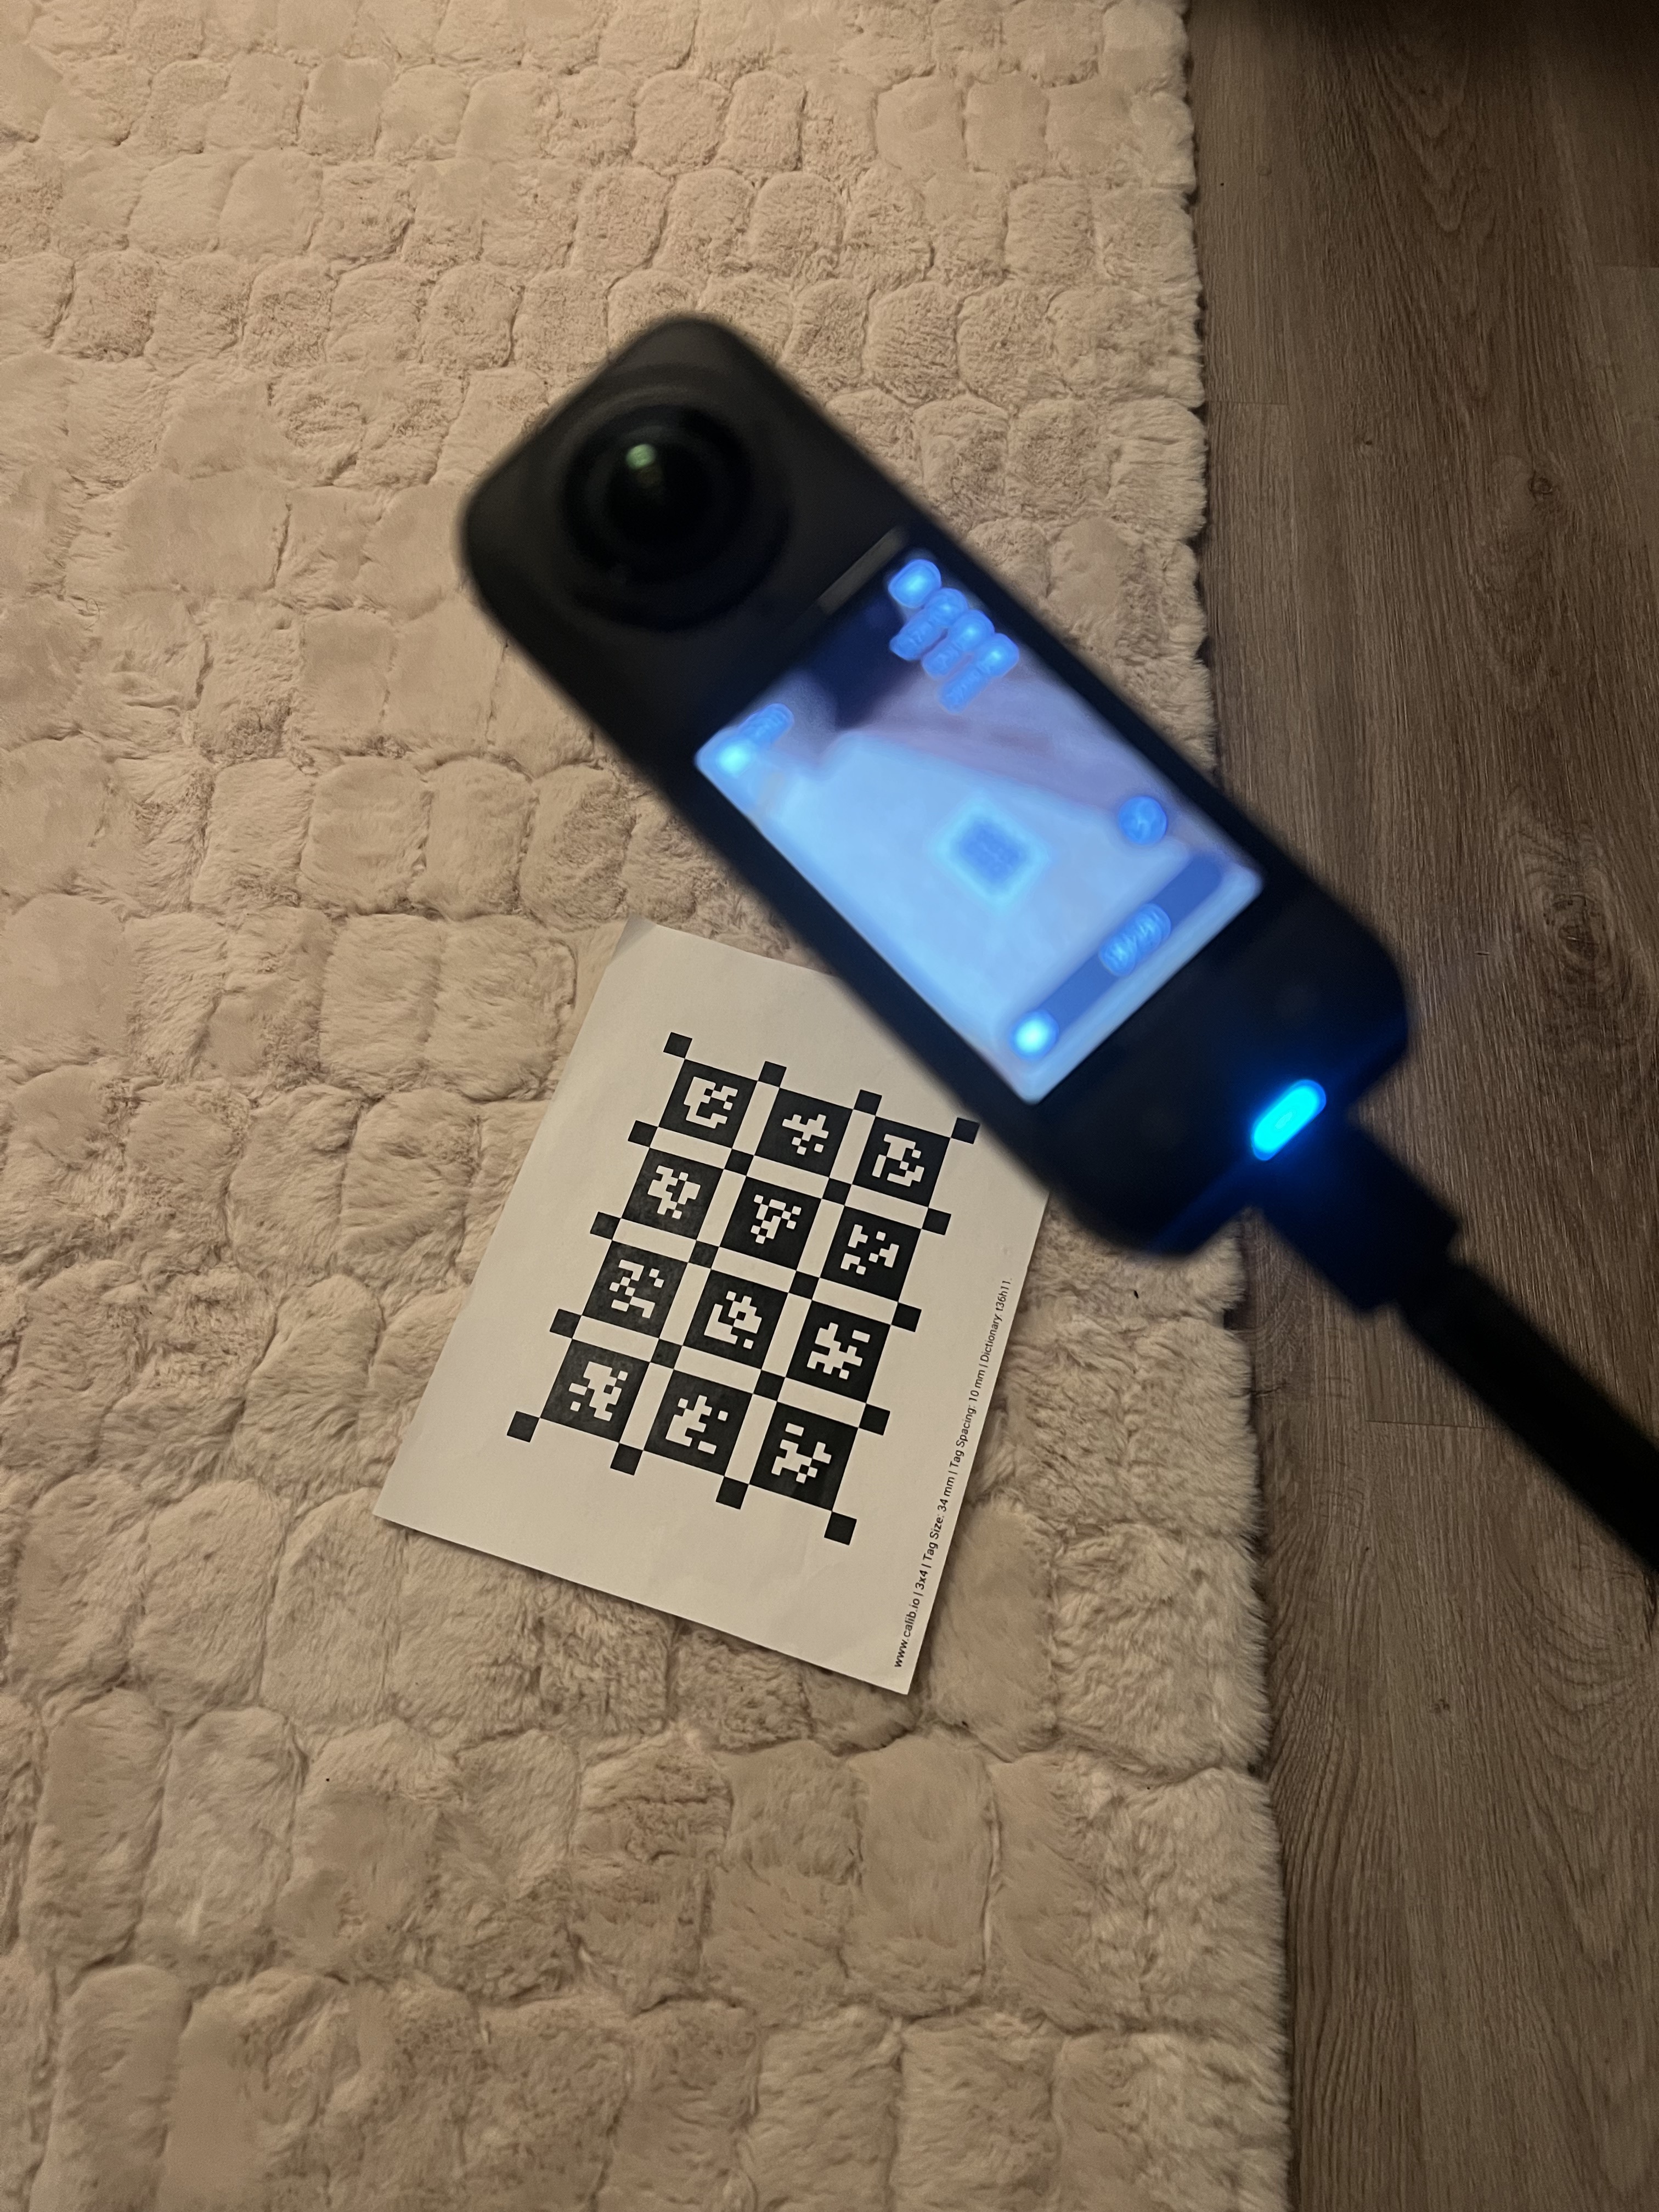
Scaniverse automatically detects the calibration board and applies 1:1 scaling during processing.
Capture a scan
This section explains how to capture a scan using a 360 camera. Focus on stable movement, complete coverage, and consistent camera setup.
Camera and equipment setup
Configure your camera before capturing. The following recommended settings are based on the Insta360 X5 but apply broadly to other supported 360 cameras.
GPS capture
Capture GPS data whenever your 360 camera supports it so that the scan retains its real-world location and movement path for geographic alignment and identification. Insta360 X4 and X5 cameras do not have built-in GPS, so a recording started with the 360 camera's shutter button does not include GPS data. To capture GPS data with the Insta360 app:
- Enable location services on your mobile device and allow the Insta360 app to access your location.
- Turn on the Insta360 camera and connect it to the Insta360 app.
- Tap the camera icon at the bottom of the Insta360 app to open the live preview.
- In the live preview, tap the vertical three-dot icon (
⋮) in the upper-right corner of your mobile device's screen and turn on GPS. - Start recording from the Insta360 app.
- Keep the app open, the mobile device's screen on, and the Insta360 camera connected during the capture.
- Stop recording from the Insta360 app.
For more information, see Insta360's instructions for recording GPS data with a phone. To capture GPS data with a compatible remote instead, see Insta360's GPS remote instructions.
Camera settings
- Resolution: 8K
- Frame rate: 30 fps, or 25 fps in PAL (EU) regions
- Adaptive tone: Off
- Video encoding: H.265
- Color: Standard
- Sharpness: Medium
- Bitrate: High
- Anti-flicker: Auto
Exposure
-
Indoor: Set shutter speed to 1/500 and ISO to Auto. The following video shows how to open exposure settings and set 1/500:
-
Outdoor: Set both shutter speed and ISO to Auto.
The following video shows how to use Auto mode:
Equipment setup
-
Use the invisible selfie stick supplied with your camera whenever possible.
-
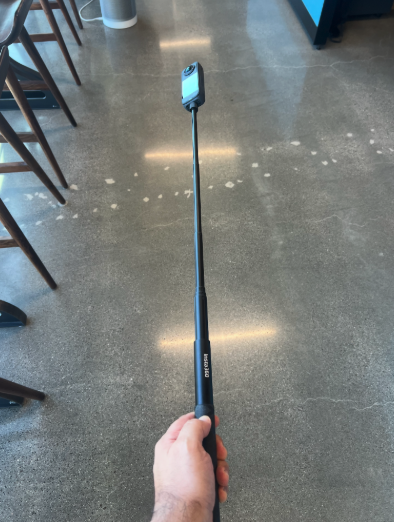
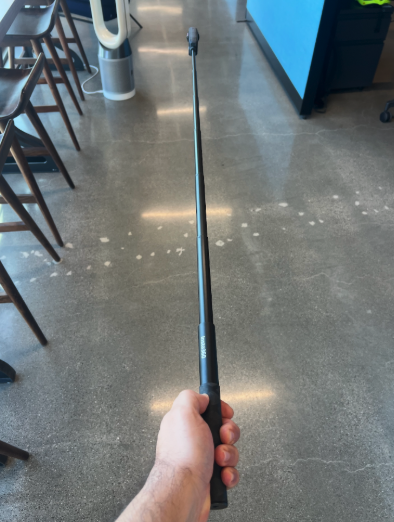
Extend the selfie stick to maintain consistent coverage while minimizing your presence in the capture:
- Indoor spaces: Extend to roughly two-thirds of its full length.
- Outdoor spaces: Extend to its full length.
-
Hold the selfie stick slightly away from your body so the camera has a clear view of the environment while minimizing your appearance in the scan. The following image shows the recommended selfie stick positions: extended to two-thirds length for indoor capture (left) and fully extended for outdoor capture (right).
-
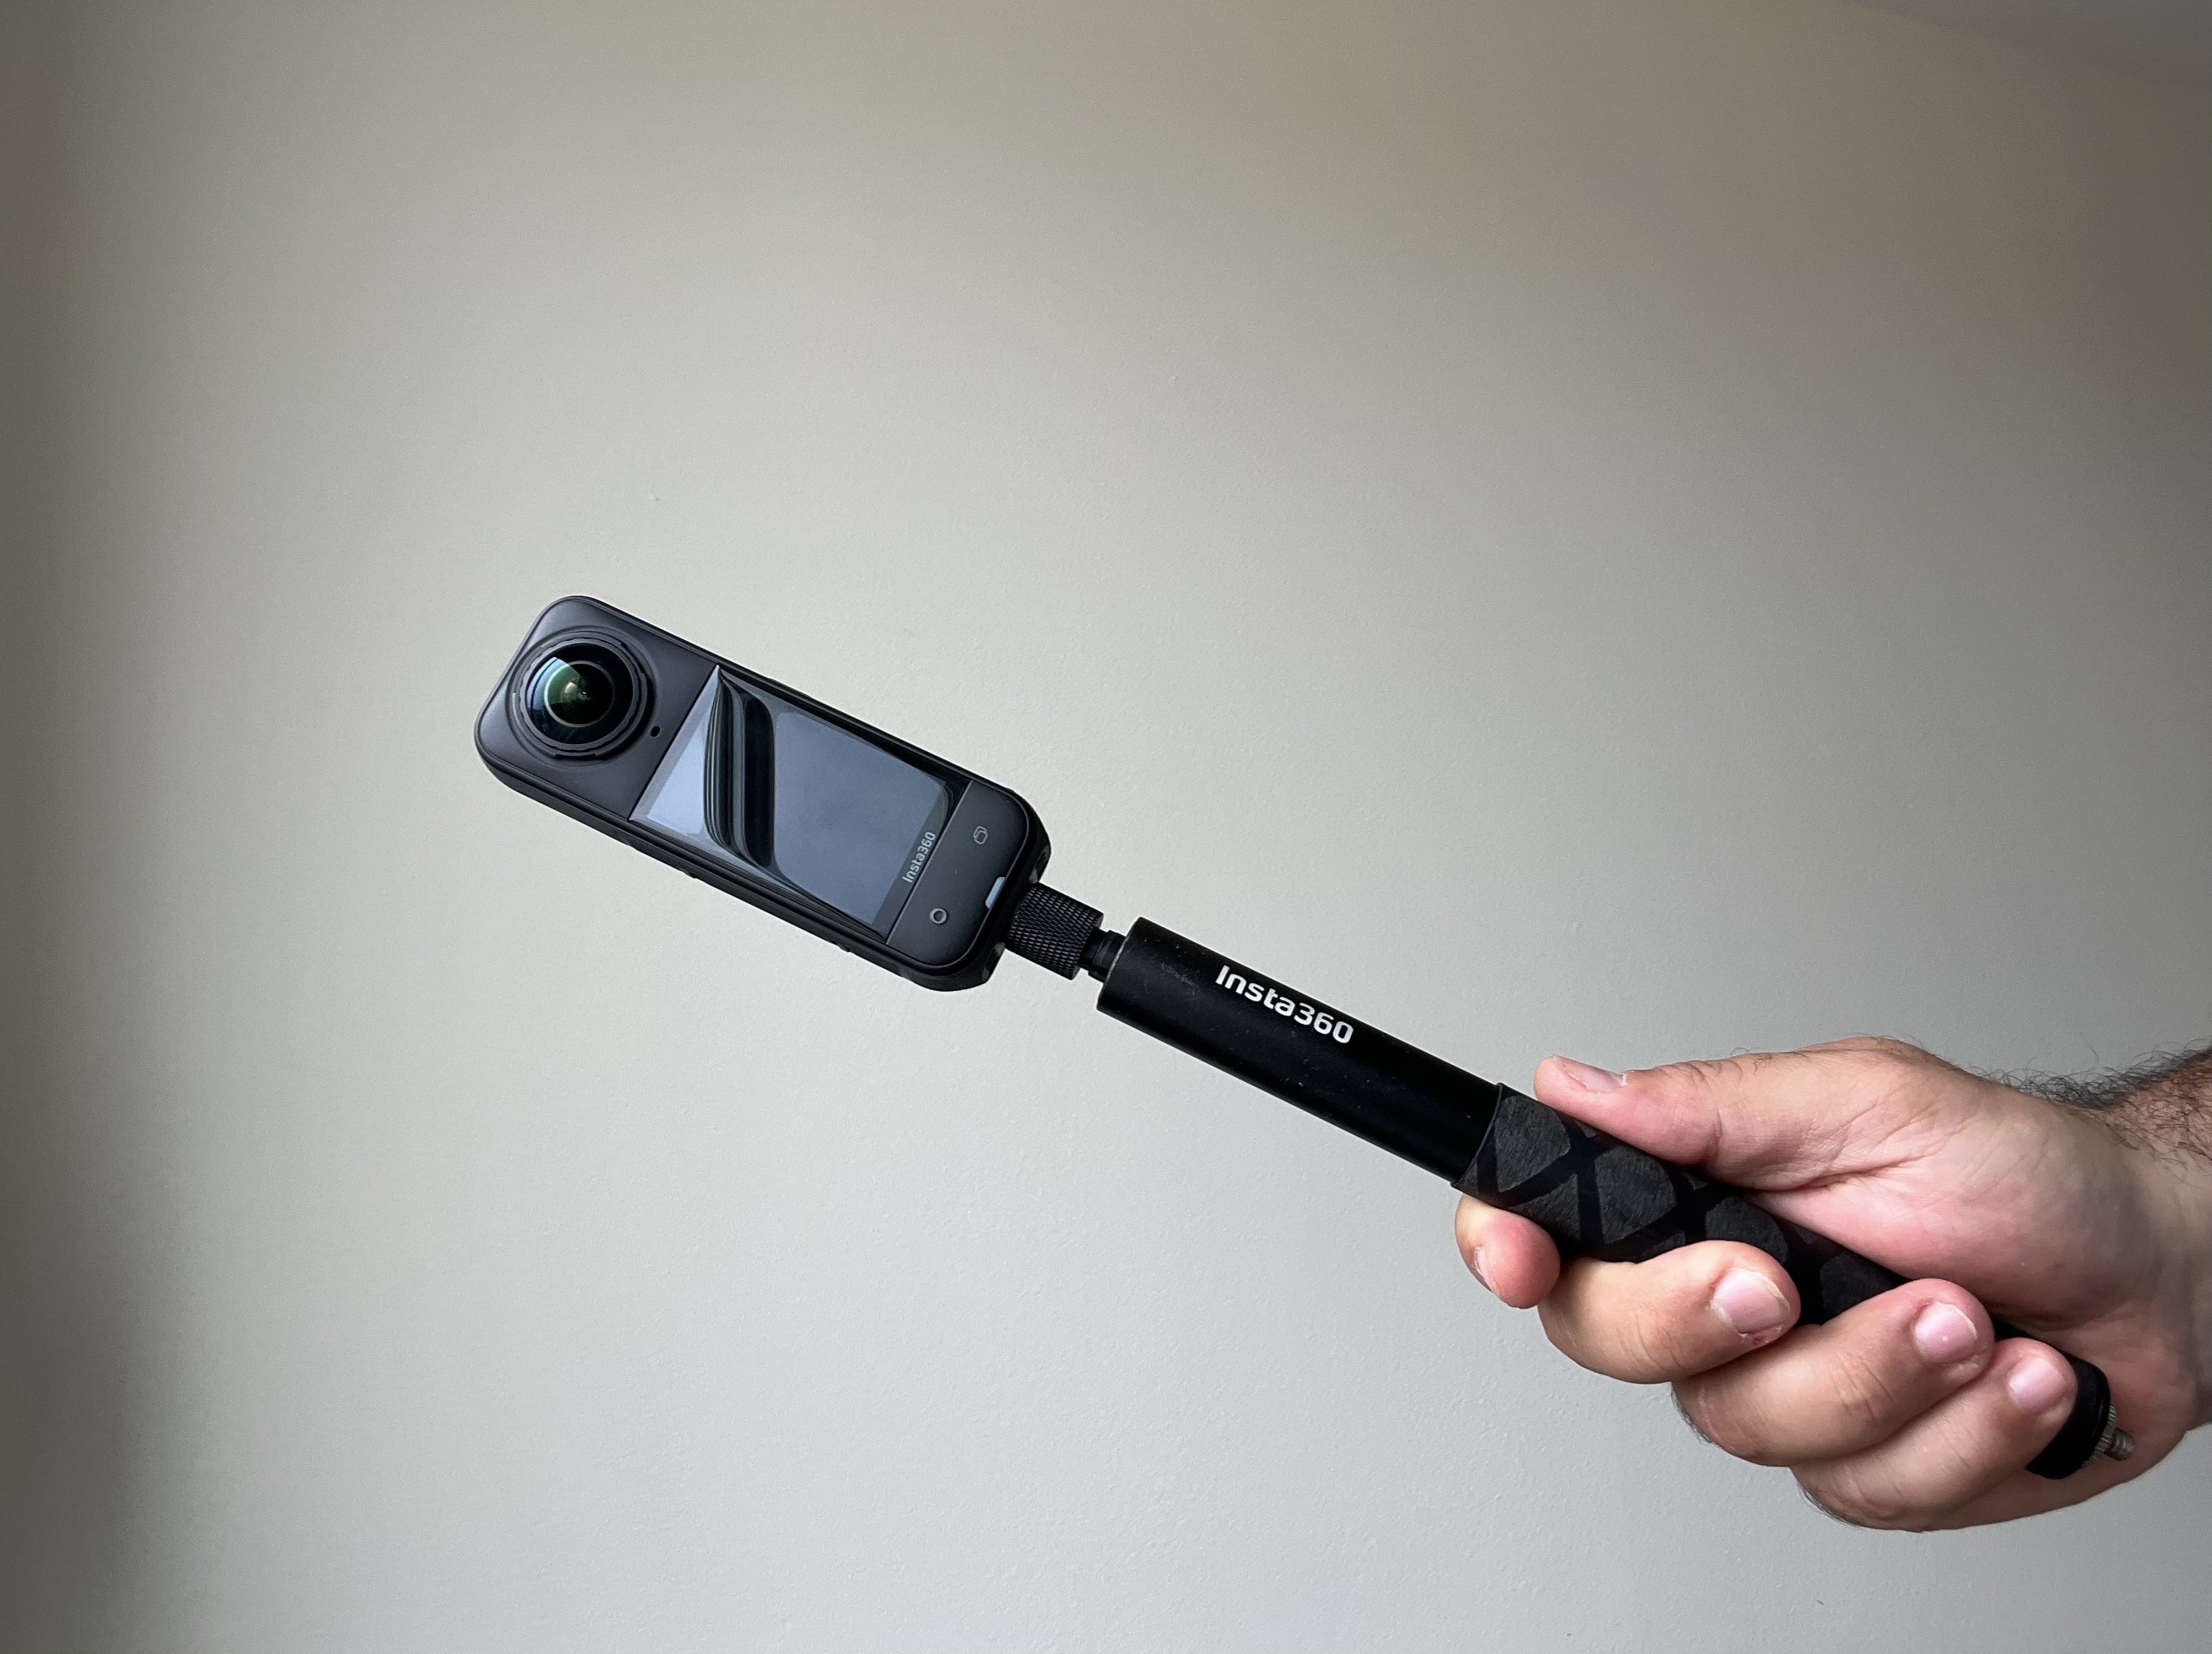
Orient the camera so the lenses face left and right relative to your direction of travel, not forward and backward.
The following image shows the orientation of the camera lenses as perpendicular to the direction of movement towards and away from the viewer:
Plan your capture
High-quality captures depend on smooth movement, consistent camera positioning, and complete scene coverage. The following techniques describe how to move through an environment to maximize reconstruction quality while minimizing alignment errors and artifacts:
Planning strategies
Divide large spaces
Divide large spaces into logical quadrants or sections and scan one section at a time rather than trying to capture the entire area at once. Complete coverage of one section before moving to the next, ensuring adjacent sections overlap. As you move between sections, capture overlapping views that connect both sections to help maintain alignment throughout the reconstruction.
Cross-grid open areas (Optional)
For large, open spaces or when the highest reconstruction quality is required, repeat the lattice grid in a perpendicular direction. For example, north-south followed by east-west. Cross-gridding improves coverage and can reduce alignment errors.
Close the loop
Toward the end of your scan, briefly point the camera back at a previously scanned landmark to reinforce alignment across the entire reconstruction. Always finish your scan by returning to the same location that you started.
Movement
The wave pattern
Use a gentle sinusoidal wave pattern as you move the camera, rather than keeping it at a constant height. This captures ceilings, upper walls, floors, and furniture in a single pass, improving coverage without requiring additional passes.
Sinusoidal motion
- Walk at a slow and steady pace.
- Slow down when capturing using a sinusoidal wave pattern.
- In darker areas, slow down to a crawl pace. A 1/500 shutter speed requires more light, and slower movement is the only way to prevent motion blur.
- Avoid jerks, bouncing, or rapid turns.
Distance
- Maintain a minimum distance of 30 cm or 12 inches from all surfaces.
- Avoid placing the camera into tight spaces or directly beneath furniture, or other overhangs unless you are intentionally capturing additional detail.
- Avoid placing objects across the stitch line between the two lenses, which can cause warping, blind spots, or artifacts in the final asset.
Coverage
Capture the entire environment with consistent overlap and as few gaps as possible. Adapt your scanning pattern to the geometry of the scene to maintain continuous coverage.
- Overlap adjacent passes.
- Avoid isolated regions that aren’t connected to the rest of the scan.
Upload and process scans
After capturing a scan, transfer your files to a desktop computer and upload them to Scaniverse Web for processing. This section covers how to prepare your files, upload them, and process and download the resulting assets.
Prepare files
Before uploading, transfer your 360 capture files to a desktop computer. Connect the camera to your computer using a USB-C cable or remove the microSD card. If connecting the camera directly, select File Transfer Mode when prompted so it appears as an external drive. Scaniverse processes 360 data through Scaniverse Web, so all uploads and processing must be done in a desktop browser.
360 processing runs exclusively through Scaniverse Web on a desktop browser, not the mobile app.
If you are using an Insta360 X5, X4 Air, or X4, you can upload raw .insv files directly without additional preparation. For all other cameras, you must first convert your footage into a stitched .mp4 file.
Pre-processing
To prepare stitched footage for upload:
- Trim: Remove unnecessary portions of the video to reduce file size and processing time.
- Enable direction lock: When exporting to
.mp4, enable direction lock to preserve spatial consistency and gyroscope orientation. - Export: Export the stitched file as an
.mp4using H.264 or H.265 encoding. Insta360 users can optionally use Insta360 Studio to preview raw .INSV recordings before uploading. If using an Insta360 X5, X4 Air, or X4, upload the original .INSV files rather than exporting a stitched .mp4.
Upload scan
After preparing your file, upload it to Scaniverse Web to begin processing. You can generate a mesh or Gaussian splat from a 360 camera scan.
- Log in to your Scaniverse Web account using a desktop browser.
- Upload your scan file:
- Insta360 X5, X4 Air, or X4: Upload the raw
.insvfile directly from your local drive or SD card. - Other cameras: Upload the stitched
.mp4file exported from your camera’s desktop software.
- Insta360 X5, X4 Air, or X4: Upload the raw
- Start the upload to begin cloud processing.
Processing begins automatically after the upload completes.
Process and download
After your 360 scan upload finishes, you can generate one or more asset types from that capture. In this step, select the 360 scan, choose whether to generate a splat, a mesh, or both, review the estimated duration and credit cost, and then download the finished asset in the format you need.
Asset types
- Splat: Best for visual quality and scene preview. Usually takes longer to generate.
- Mesh: Best for geometry-based 3D workflows and exports.
After your upload completes, generate assets as follows:
- Select the Site that contains the scan you want to process.
- Select Generate assets.
- Enter an Asset name.
- Under Choose your scan type, select 360 scan.
- Select the uploaded 360 scan from the list. A preview and scan details appear on the right.
- Under Choose what assets you want generated, select one or both of the following:
- Splat
- Mesh
- Review the Capture duration and Credits required summary at the bottom of the window.
- Select Generate.
During processing, Scaniverse extracts frames from your video and reconstructs the scene. The 360 scan flow generates assets from a single 360 capture. Processing time depends on file size, complexity, and which asset types you selected.
Video length limits
- Free plan: 360 camera asset generation is not available.
- Plus plan: uploads are limited to videos up to 5 minutes.
- Pro plan: uploads are limited to videos up to 10 minutes.
Capture each site as a single continuous recording whenever possible. If your recording exceeds your account's supported upload duration, split it into shorter recordings before uploading.
View assets
Once processing is complete, you can inspect the generated mesh or splat directly in Scaniverse Web.
Supported output formats
Download the generated asset in the following formats:
- Splat:
.ply,.spz,.usdz - Mesh:
.glb,.usdz
Troubleshooting and FAQ
This section covers common issues and frequently asked questions when capturing and processing 360 scans.
Blurry splats
Use a shutter speed of 1/500 for indoor environments to reduce motion blur.
Drifting or warped environments
If you used the .mp4 workflow, verify that direction lock was enabled during export.
Avoid overscanning Avoid repeatedly scanning the same area. You can pass through an area twice to connect different parts of a scan, but excessive rescanning can introduce SfM (structure from motion) or small alignment errors that reduce the sharpness of the final reconstruction.
Handling large files
If your capture exceeds your account tier’s video length limit, trim the footage into smaller segments using your camera’s desktop software before uploading.
Can I upload a 360 panoramic image (.jpg, .png, etc.)?
No. Scaniverse supports only 360 video files: raw .insv files from Insta360 X5, X4 Air, and X4, or stitched equirectangular .mp4 files from other cameras. Still panoramic images are not supported.
Can I upload 360 videos via the mobile app?
No. Uploading and processing 360 video files is only supported via Scaniverse Web on a desktop browser.
Can I generate a mesh from a 360 camera scan? Yes. In the Generate assets flow, choose Mesh instead of Gaussian splat.
Can I export a 360 scan as USDZ? Yes. Supported 360 splats and meshes can be downloaded as a combined USDZ file from Scaniverse Web.
How can I produce a splat that can be used for 3D measurements?
Print the calibration board US Letter | A4 and circle it with your camera at the start of your recording. Scaniverse automatically scales the resulting asset to real-world 1:1 metric measurements.
Can I use a 360 drone?
Yes, you can use 360 videos from 360 drones such as the Antigravity A1 and DJI Avata 360.
Do I need desktop software to process my files?
- No, if you have an Insta360 X5, X4 Air, or X4. Scaniverse Web natively supports raw
.insvfiles from these models. No additional software is required. - Yes, if you use any other camera. Use the manufacturer’s desktop software to stitch your footage into an
.mp4with direction lock enabled before uploading to Scaniverse Web.